 I phoned Dax about the handbrake thing, and spoke to Gary who is very knowledgeable
about all things Dax. Half way through explaining the problem he took over, as apparently the issue has already
come up with some other people. He disarmingly, and rather endearingly, admitted that it was a cock up that they
had completely missed, having not actually made up an LWB version themselves. We discussed various possibilities
and he's gone off to have a think. I arranged to phone him on Friday to see how he was getting on.
I phoned Dax about the handbrake thing, and spoke to Gary who is very knowledgeable
about all things Dax. Half way through explaining the problem he took over, as apparently the issue has already
come up with some other people. He disarmingly, and rather endearingly, admitted that it was a cock up that they
had completely missed, having not actually made up an LWB version themselves. We discussed various possibilities
and he's gone off to have a think. I arranged to phone him on Friday to see how he was getting on.
I had some email from Alex who's turned my rusty engine mountings into nice shiny engine mountings. Hopefully, I can find the time to go and pick them up soon. Thanks Alex!
 So, in the absence of any more constructive
to do to the handbrake, I turned to the rear quater panel. I started with the passenger one and started hacking
away at GRP. I haven't had this familiar hacking cough for a while, but it's back now.
So, in the absence of any more constructive
to do to the handbrake, I turned to the rear quater panel. I started with the passenger one and started hacking
away at GRP. I haven't had this familiar hacking cough for a while, but it's back now.
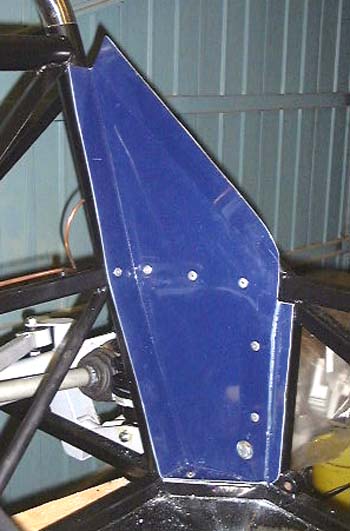
To cut a long story short, it was fairly easy to fit, after I realised I had to remove a large amount to make it fit around the suspension trailing arm bolt. After trimming a lot of the GRP away I rivetted it in place as shown. Having read what other people have had to do that seemed rather easy. However, I suspect that the flange at the top right will have to be trimmed when I get to fitting the rear wings. At the moment it's not possible to see.
One problem is that the Rush build on the Dax web site shows a row of rivets along that top edge. This is odd as there's only a rather thin tube behind it. It might be possible to put some more rivets in here but again I'll have to wait until after the wings are offered up.
When writing this item I've realised that I forgot to add the mystical Würth adhesive...I'll have to drill the rivets out again tomorrow...doooohhhh.
 After the absence of Würth cock-up, I drilled out the rivets and replaced
everything with lots of sticky black stff. As is usually recommended I squirted some fresh Waxoyl into the hole
out of which I'd just drilled the rivets to try and stick down the bits that were now free-floating on the inside
of the chassis...
After the absence of Würth cock-up, I drilled out the rivets and replaced
everything with lots of sticky black stff. As is usually recommended I squirted some fresh Waxoyl into the hole
out of which I'd just drilled the rivets to try and stick down the bits that were now free-floating on the inside
of the chassis...
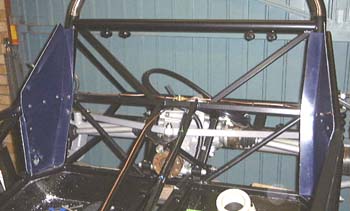
I then went through the fitting process on the driver's side of the car.
 Appearances notwithstanding, I did manage to do something to the car this weekend.
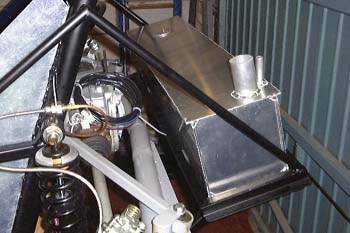
The first job was to finish the fuel lines, of which the first bit was to mount the tank. This was pretty easy to do with the aid of some rivnuts to mount the straps supplied by Dax.
I was a bit depressed about the powder coating on the staps, which was just falling off. In fact, having helped Jim, a local se7ener, to unload his new Westfield kit at the weekend I feel that some of the aspects of the Dax chassis leave considerable room for improvement. In particular, there us quite a lot of welding spatter around most of the welds, and the powder coating does not have that mirror-like finish that I would like to see. It remains to be seen how long it will survive. I have heard of people who say that you shouldn't get the chassis powder coated, but get it in bare steel and Waxoyl/hand paint it for a longer lasting finish. They could well be right.
 Next, I had to find somewhere to mount the fuel pump, about which there is diddly
squat in the manual. After some perusal it seems that the horizontal chassis member just behind the driver's bum
was the right place. One of the problem with the de Dion version of the car is that there are few places that are
available to screw things to. The IRS version has a sort of cage in the middle that the diff lives in. In the de
Dion version the diff seems to be a bit further forward and it is not possible to route things through the middle
because the de Dion tube should be flailing up and down all the way across.
Next, I had to find somewhere to mount the fuel pump, about which there is diddly
squat in the manual. After some perusal it seems that the horizontal chassis member just behind the driver's bum
was the right place. One of the problem with the de Dion version of the car is that there are few places that are
available to screw things to. The IRS version has a sort of cage in the middle that the diff lives in. In the de
Dion version the diff seems to be a bit further forward and it is not possible to route things through the middle
because the de Dion tube should be flailing up and down all the way across.
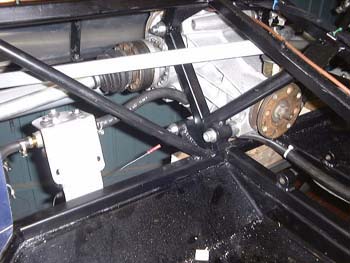
The problem with mounting the pump where I mentioned is that the bracket that comes with the pump isn't really long enough. So, I welded a lump of steel to the bracket (I made a horrible job of this, until I discovered that the CO2 bottle on my welder was not being opened enough.) and painted it all in silver Hammerite before bolting it to the chassis.
The inlet pipe to the pump goes along the inside of the chassis member that goes underneath the de Dion tube, and has an in-line fuel filter to protect the pump from clag. I'm still unsure about whether to put a fuel regulator at the other end of the fuel hose, like the Westfield has.
 The next job was to make some progress on the rear wiring loom. I had already
routed it to the rear of the car, but having now the opportunity for a closer look it was apparent that it would
be best if I split it into two bits, for the left and right rear. So, I split the appropriate wires out and mounted
them around the rear of the car. Along the way, I split out a new wire for a (possible) high rear brake light.
Experience with the Westfield is that people just don't see you in cars like this, so everything like this is worthwhile.
The next job was to make some progress on the rear wiring loom. I had already
routed it to the rear of the car, but having now the opportunity for a closer look it was apparent that it would
be best if I split it into two bits, for the left and right rear. So, I split the appropriate wires out and mounted
them around the rear of the car. Along the way, I split out a new wire for a (possible) high rear brake light.
Experience with the Westfield is that people just don't see you in cars like this, so everything like this is worthwhile.
I haven't done it yet, but I'll attach the loom tails around the rear of the car and leave some loose leads for when I get the bodywork and lights in position.
in case you've got to this frame directly and can't get out, go here.