 As I had to do some real work today (on a Sunday!!) I didn't have time to do
very much.
As I had to do some real work today (on a Sunday!!) I didn't have time to do
very much.
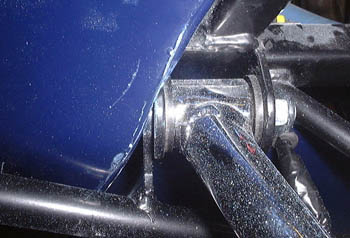
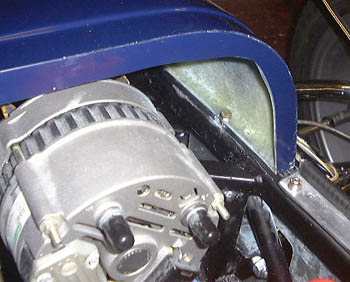
However, it was back to the bodywork. This time it was the nose cone. I spent ages working out where it was going to have to fit, and grinding away some of the material to fit around the upper wishbone mountings. I think I mentioned that the nose cone is clearly designed for a different sort of front suspension. The photo shows one of the wishbone mounting bolts, and its relationship to the bulge that's supposed to clear it. You can see fairly clearly that the bulge is really lower down.. Oh well.
After a while it fitted satisfactorily. Interestingly, it ended up in a position where there was quite a difference between the length available for the bottom on the left and right. I spent a while worrying about this until I realised that the difference was mirrored on the bonnet moulding itself.
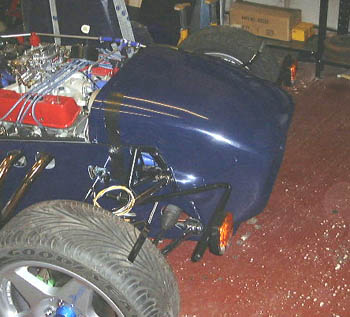
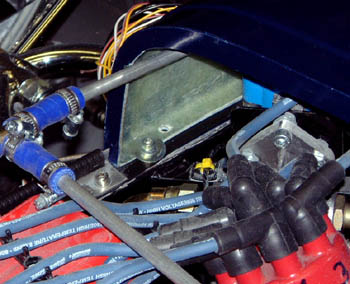
 Next it was the question of how to fit the nose cone. Most people seem to try
and make them hinge at the bottom, although the SVA bars get in the way at first. All the same, it seemed a sensible
thing to do. So, I drilled through into the chassis rail at the extreme corner of the nose cone and and mounted
a couple of M6 rivnuts in the chassis. I could them use a piece of aluminium tubing to make something for the nose
cone to rotate about, as shown in the photo.
Next it was the question of how to fit the nose cone. Most people seem to try
and make them hinge at the bottom, although the SVA bars get in the way at first. All the same, it seemed a sensible
thing to do. So, I drilled through into the chassis rail at the extreme corner of the nose cone and and mounted
a couple of M6 rivnuts in the chassis. I could them use a piece of aluminium tubing to make something for the nose
cone to rotate about, as shown in the photo.
 The nose cone was then mounted.
The next thing to do is to work out how to attach it at the top. Some people don't bother with this, as bonnet holds it down anyway. However, on my chassis the unsecured nose cone is really too narrow in its natural position. It can quite easily be flexed into position but it's not clear whether the bonnet will exert enough force to do that. I suspect I'll put a couple of extra rivnuts on the top chassis rail and bolt through the flange on the nose cone, in much the same way as the Westfield nose cone is mounted.
For now, it's held down with some gaffa tape!
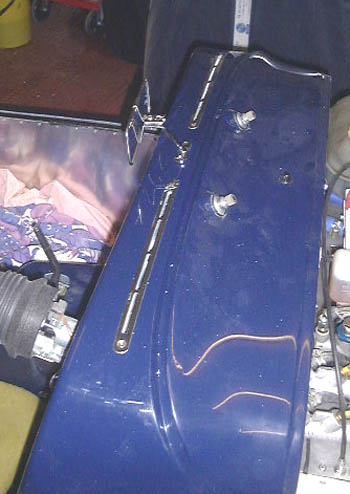 Before getting back to the nose cone, I did a couple of odds and sods. First of all, a while ago I
bought some shiny covers for the demister vents from Dax. I fitted these. The problem with them was that getting
at the other side of the vents, in order to do up the nuts, was quite hard on account of the demister ducting being
on the other side. I finally had to drill all the way through the demister ducting, widen the hole so that I could
get a nut spinner back in and finally patch up the hole with some gaffa tape. I also attached the rear view mirror
using some rivnuts. Mind you, I think I'll have to remove this for SVA.
Before getting back to the nose cone, I did a couple of odds and sods. First of all, a while ago I
bought some shiny covers for the demister vents from Dax. I fitted these. The problem with them was that getting
at the other side of the vents, in order to do up the nuts, was quite hard on account of the demister ducting being
on the other side. I finally had to drill all the way through the demister ducting, widen the hole so that I could
get a nut spinner back in and finally patch up the hole with some gaffa tape. I also attached the rear view mirror
using some rivnuts. Mind you, I think I'll have to remove this for SVA.
Talking of SVA, I got an appointment through today. I use the indefinate article as I'm going to have to change it; the chance of making April 24th has to be zero! Still, this means I'm through the system at Swansea at least.
 I wanted to get back to the nose cone, but I also wanted to check that there was some chance
of everything fitting. So, I wanted to at least place the bonnet in position. This isn't easy at the moment as
the carburettor is in the way. So, I worked out where the carb was on the bonnet and cut a fairly large hole. It
will have to be made even larger in a while, in order to fit the air cleaner through.
I wanted to get back to the nose cone, but I also wanted to check that there was some chance
of everything fitting. So, I wanted to at least place the bonnet in position. This isn't easy at the moment as
the carburettor is in the way. So, I worked out where the carb was on the bonnet and cut a fairly large hole. It
will have to be made even larger in a while, in order to fit the air cleaner through.
However, this showed that I at least have a chance of making it fit, although I'm probably going to need some edging strip to neaten up the not very wonderful fit between the bonnet and scuttle/nose cone.
 Finally, I got back to the nose cone, and, by a lot of pushing and shoving,
got a rivnut into the chassis and the nose cone bolted down on one side. Once this is done it seems to fit rather
better, although I can see that undoing this all the time is going to get tedious, and some alternative fastening
based on something like Dzus fasteners would be a much better idea.
Finally, I got back to the nose cone, and, by a lot of pushing and shoving,
got a rivnut into the chassis and the nose cone bolted down on one side. Once this is done it seems to fit rather
better, although I can see that undoing this all the time is going to get tedious, and some alternative fastening
based on something like Dzus fasteners would be a much better idea.
 I haven't had chance to update this page for a couple of days, hence the coagulated
entry.
I haven't had chance to update this page for a couple of days, hence the coagulated
entry.
I phoned up the Norwich testing station and reorganised my SVA for May 8th. However, I might have been being too optimistic there.
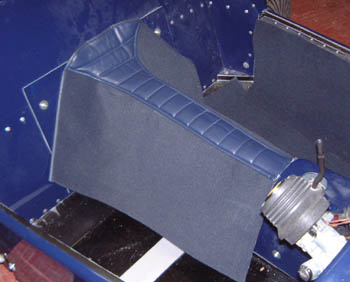
I went down to Dax and picked up the carpets. They don't seem to fit very well, if at all, and they're of very low quality carpet. However, they'll probably do.
 I finished mounting the nose cone, having put moved the mounting bolts about
to make them a bit easier to get at. It's quite firm now. The obvious problem, though, is that to get at the things
that are inside the nose cone, such as the radiator, I'll have to unbolt it all the time.
I finished mounting the nose cone, having put moved the mounting bolts about
to make them a bit easier to get at. It's quite firm now. The obvious problem, though, is that to get at the things
that are inside the nose cone, such as the radiator, I'll have to unbolt it all the time.
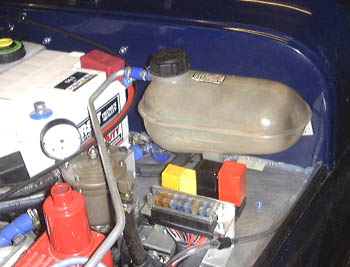 Having tried to fit the bonnet a while ago, I knew that there were some problems.
After looking it was obvious that the bonnet was fouling the expansion tank filler cap. This was a bit a bummer
as there didn't seem to be too much room for manouevre. I looked up the price of the Dax ones and decided to have
another go.
Having tried to fit the bonnet a while ago, I knew that there were some problems.
After looking it was obvious that the bonnet was fouling the expansion tank filler cap. This was a bit a bummer
as there didn't seem to be too much room for manouevre. I looked up the price of the Dax ones and decided to have
another go.
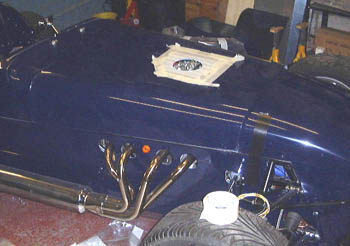
After a lot of faffing about, it was in the right position, and seems to be mostly functional here. I'm a bit concerned that it's all a bit tight but we'll see how it goes.
With this done and the nose cone done, I can have a go at fitting the bonnet properly tomorrow... In order to do this, I'm going to have to cut the hole in the bonnet properly.
in case you've got to this frame directly and can't get out, go here.