August 8th
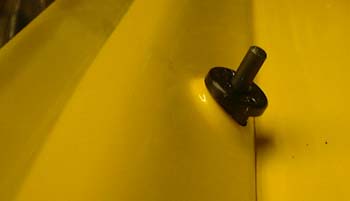 Having done all that is was time to take the scuttle off again.
Hopefully, it's now well enough marked to be able to get it back in the same place again.
Having done all that is was time to take the scuttle off again.
Hopefully, it's now well enough marked to be able to get it back in the same place again.
The next job is to mount the wiper wheel boxes on the scuttle. This turns out, like all the jobs at the moment, to be a pain in the neck. The problem is that it is impossible to get the wiper shaft to match the angle of the face on the windscreen fillet, as in the photo. The main reason that this is impossible is that the wheel box fouls the demister ducting on the inside of the scuttle. It would seem to be possible to cut into the ducting, but only at the loss of the centre vent which might be a problem SVA-wise.
As I'm stumped on this one, it seems that another call to the factory is in order.
August 16th
After much hacking about I finally managed to get somewhere with the wiper wheel boxes. (At this point thanks
to the many people who contacted me to comment on the difficulty that they have had with this bit.) It seems as
though there were two problems. 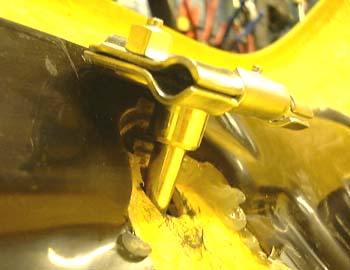 The first is that the demister ducting installed
so carefully earlier just gets in the way, the second is that the rubber
sleeves around the wiper shafts are just too thick as they foul on the ducting and the various protuberances in
GRP. This photo shows, with a bit of 3D imagination, the lack of room for thick rubber sleeving around the wiper
shaft.
The first is that the demister ducting installed
so carefully earlier just gets in the way, the second is that the rubber
sleeves around the wiper shafts are just too thick as they foul on the ducting and the various protuberances in
GRP. This photo shows, with a bit of 3D imagination, the lack of room for thick rubber sleeving around the wiper
shaft.
At one point I took off the demister ducting again, not a simple affair involving excitable use of a Stanley knife, as I became convinced that I had it on the wrong way around. (I didn't.) However, with it off it was a relatively easy task to trim the rubber sleeves until the wipers, at least, fitted OK. They are not perfect, but pretty good. Someone said that it was a good idea to try them with a complete wiper arm and blade to check that the wiper did not jump away from the screen at one point because the joint had "over-centred" which seemed a very sensible idea.
However, with the ducting off it was easy enough to get the wipers working. The next problem was getting the
ducting back on again. I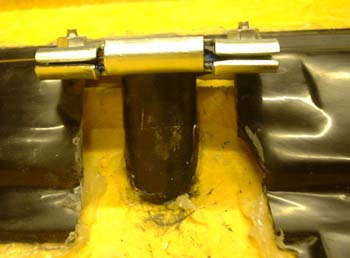 t was quite clear that it just wasn't going to go.
Actually, I have become convinced that the underlying problem is that Westfield have changed the design of the
ducting--it doesn't match the drawings in the manual at all--and haven't adjusted the wheel boxes to suit.
t was quite clear that it just wasn't going to go.
Actually, I have become convinced that the underlying problem is that Westfield have changed the design of the
ducting--it doesn't match the drawings in the manual at all--and haven't adjusted the wheel boxes to suit.
After struggling with this I decided that the best thing to do was to chop a piece out of the ducting so that it could be got back together and work out how to seal up the leaks later. (Silicone sealant, and lots of it, comes to mind!) Hence, a similar view of the wheel boxes now looks like this photo. With luck you can see I have chopped a lot off. (Note that in this case the wheel box has its sleeve fitted.
So, after worrying about all this for a week, I stuck the demister ducting back and braced it in position for the sealant to cure.
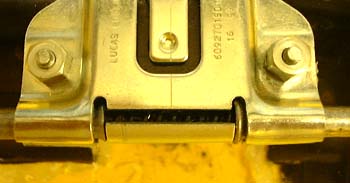
Unfortunately, at this point I decided to check the wiper tubing, the steel tubes inside which the wiper rack
thrashes back and forth. 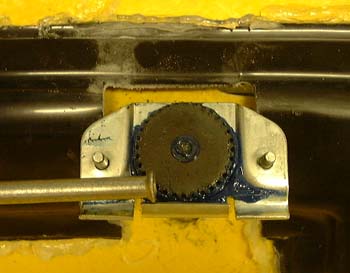 It was easy to see that the central tube, the bit
between the two wheel boxes, is about 5mm too long. In this photo the other end of the tube, the one you can't
see, is in the correct position in the other wheel box. You can easily see the overshoot.
It was easy to see that the central tube, the bit
between the two wheel boxes, is about 5mm too long. In this photo the other end of the tube, the one you can't
see, is in the correct position in the other wheel box. You can easily see the overshoot.
I have no idea what to do about this as the wiper tubing seems to be made out of crystallised Kryptonite and resists all the most brutal attempts at changing its position in space. I could easily cut it, I think, but re-establishing the flare you can see at the end of the tube looks tricky.
 Luckily, other people have managed all this stuff. A local seven builder who
is building a Dax has just passed his SVA and I spent a while reading about it on his web site. He has had all sorts of tribulations so it's clearly possible. At least I still seem
to be moving forward.
Luckily, other people have managed all this stuff. A local seven builder who
is building a Dax has just passed his SVA and I spent a while reading about it on his web site. He has had all sorts of tribulations so it's clearly possible. At least I still seem
to be moving forward.
Luckily, I've got some stores in the garage to keep me going. I wonder if I should denote that bottle of champagne to finishing the car, or perhaps just the wipers?
August 17th
 Made a start on patching up the gaping holes in the demister ducting, using
the bits of GRP chopped out of them which pleased me!
Made a start on patching up the gaping holes in the demister ducting, using
the bits of GRP chopped out of them which pleased me!
After that (and while the first blobs of sealant are drying) I started on the wiper drive tubing. I got hold of (that is, bought from MacKay's) a suitable pipe bender and set about the long tube that goes from the wiper motor to the left hand wheel box. It quickly became apparent that if the pipe is bent too much it is very easy to kink slightly which makes the movement of the wiper rack just impossible. The obvious solution to this is actually to shorten the pipe a bit, which allows it to take a more gradual turn. As I will have to cut down the centre pipe anyway this just means I have two flares to make rather than one. As I suspect I already have to get hold of a flaring tool to do this anyway this will mean each flare will cost me half as much--so it's obviously good economics. :-)
August 18th
 However, there appear to be no flaring tools available in England. MacKay's
haven't got any, somewhere else says they can't get them anymore, someone says they've asked everywhere and "they're
on back order at the factory". (I thought factories made things, not ordered them, but perhaps that's
a dangerously regressive 19th century notion.)
However, there appear to be no flaring tools available in England. MacKay's
haven't got any, somewhere else says they can't get them anymore, someone says they've asked everywhere and "they're
on back order at the factory". (I thought factories made things, not ordered them, but perhaps that's
a dangerously regressive 19th century notion.)
So, I set about manually flaring the pipes, as it occurred to me that it was only for location, nothing like as important as the flaring that has to be done, for example, on the ends of brake pipes. This was actually rather successful and in a while I had produced something that was acceptable, at least I think it is. In this photo you can see my weedy flare on the left and the Westfield one on the right of the wheelbox. My only concern is about the location of the pipe onto the wiper motor itself, as that's really the only place where this pipe shape is actually doing anything.
 After that it was onto fitting the heater unit.
This (at last) was fairly easy and I ended up with a complete scuttle, as seen here. I only hope that all the messing
about with the ducting means that it will still work. It's bound to be OK for the outlets at the sides but the
one in the middle is an unknown quantity. However, what on earth one actually wants a demister for on a car like
this is anybody's guess.
After that it was onto fitting the heater unit.
This (at last) was fairly easy and I ended up with a complete scuttle, as seen here. I only hope that all the messing
about with the ducting means that it will still work. It's bound to be OK for the outlets at the sides but the
one in the middle is an unknown quantity. However, what on earth one actually wants a demister for on a car like
this is anybody's guess.
The next job is supposedly to fit the scuttle back onto the car, but I think I need to resolve the positioning of the ECU, which is still unresolved. My friend Paul suggested above the passenger's feet, but I looked at this and it looks as though my size 12s would bash into it there. If nothing else, it would get kicked all the time which could possibly dislodge the connector.
I'll check this all next time.
August 19th
 So, I hunted high and low for a place to put the ECU. (Why isn't this in the manual?) Having
placed the scuttle back on the car it was clear that it wasn't going to go on top of the transmission tunnel in
the middle as there was a heater there now. I was still unsure about whether I could put it above the passengers
feet as I feel uncomfortable about the cabling; it could be kicked out and would, in any case, have to be routed
away from the footwell.
So, I hunted high and low for a place to put the ECU. (Why isn't this in the manual?) Having
placed the scuttle back on the car it was clear that it wasn't going to go on top of the transmission tunnel in
the middle as there was a heater there now. I was still unsure about whether I could put it above the passengers
feet as I feel uncomfortable about the cabling; it could be kicked out and would, in any case, have to be routed
away from the footwell.
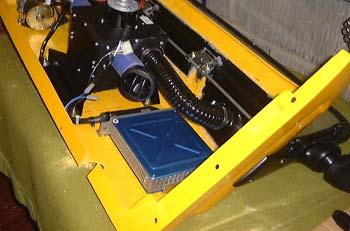
This left only one place: on the scuttle again, but on the right--directly in front of the steering column. Experimentation showed that it would be possible to get it out of there in an emergency even when the scuttle was in. The cabling would logically go under the heater and pass through the scuttle on the left hand side of the middle.
So, I made a little bracket out of a piece of aluminium angle to hold the back of the ECU and attached it to the scuttle.
The only problem with this now is that the wiring is completely obscure. The issues seem to be:
- The air temperature sender is supposed to be mounted in or as near as possible to the inlet air flow. There's no indication of how to do this.
- There are two cables labeled "switch 1" and "switch 2" in the manual. There is no indication what they do.
- Some wiring is needed to connect to the power and to the tacho, again it's not clear how to do this.
Perhaps the thing to do is to put the scuttle back in and then worry about all this.
August 20th
Drilled a big hole in the scuttle for the ECU cabling. I also phoned Westfield and asked Chris Masters a long list of technical questions. For example, the switch 1 and 2 wires mentioned above should just be kept clear. Also, the air temperature sender should be mounted in the backing plate for the air filter, which is pretty obvious really.
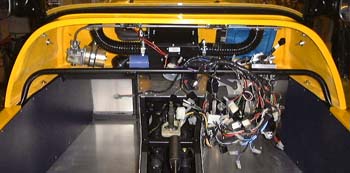 The manual recommends installing the inner panels next, which I did and it was
interesting to see the car starting to look more like something that could be driven due to the appearance of some
trim. Next, the scuttle was mounted back on the car after a lot of checking that all the bodywork was in the right
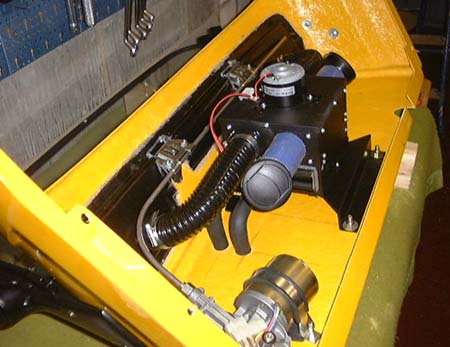
place. It now looks very crowded under the scuttle, as you can see.
The manual recommends installing the inner panels next, which I did and it was
interesting to see the car starting to look more like something that could be driven due to the appearance of some
trim. Next, the scuttle was mounted back on the car after a lot of checking that all the bodywork was in the right
place. It now looks very crowded under the scuttle, as you can see.
The scuttle is now bolted back with a load of (guess!) silicone sealer under it so as to separate the outside world from the inside. Of course, there's a large hole in the top of the car with our heads sticking out of it to attract the outside world but one has to show willing.
in case you've got to this frame directly and can't get out, go here.