 So, it’s full on to build a new car. I got the vast majority of the bits last week when Andy drove over with everything he’d got. Well, that was the intention but he left one vital box behind… Here’s the chassis sitting on my (newly swept!) garage floor.
You’ll notice that it is, as yet, not powder coated. This is because I’m going to have to do some small modifications to fit me in. In particular I’m going to have to move the steering wheel and, perhaps, the pedal box. So, I’m intending to build up the car as it is and then take it to bits again. I know it sounds daft but all the books say that this is the right thing to do…You might well ask why the car’s sitting on the floor rather than on stands. This is because that floor isn’t properly attached at the moment. It’s only temporarily attached with a few aluminium rivets. As such, it wouldn’t take the weight of yours truly sitting on it. Later on, when I’ve sorted out seating positions, etc., it’ll be bonded on and attached with some stainless rivets.
Andy’s almost gone overboard on the way he’s delivered the parts but I know this is what he’s planning on doing for other customers. As before, I’m very impressed with the quality of manufacture. In the following group of photos you can see:
- some detail of the outboard end of one of the wishbones,
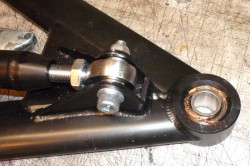
- the inboard end complete with rod-end,
- some more detail of the chassis welding,
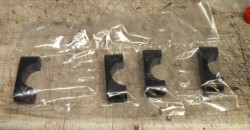
- some of the parts as they’re delivered in separate fused bags (in this case the mounting brackets for the rack) and
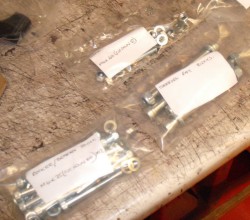
- a small sample of the fasteners.
 |
 |
 |
 |
 |
 So, as you can probably tell, I’m quite chuffed about that. What I need to do now is to actually put some of it together. So, I did. here’s the steering rack fitted along with the track rods. (Note for the future, you can’t actually fit the rack with the trackrods connected, so don’t bend over the locking tabs on the inner joints before doing that.)
You can see one of the reasons I bought the Sabre in this photo. If you look hard you can see a shim stack above the rack. This give you an easy way of adjusting bump steer it’s really nice to see this thought about in advance. You might also be able to see that this is attached with plain nuts. I’m doing that everywhere so that I can just do things up finger tight without faffing about the nylocs and the like.
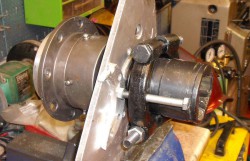
 At the moment, though, I do have one big problem. This is about the diff that I took out of the J15. One of the inner CV joint cups seems to be seized solid in the diff. You can see the cup on the right of this next photo, with the diff over on the left. I’ve got a puller around the cup here, artfully supported by various cobbled together spacers.
Normally you just lean on it and it pops out (there’s a snap ring around the end of the splines). However, this one is resisting me manfully. I’ve tried using a puller without much success so far, after the usual approach of just levering things failed dismally. Next approach is going to be trying to use a slide hammer.
 Back on the Sabre itself, I spent quite some time climbing in and out of the car, using my old J15 foam seat, to test out various positions for the steering wheel/column. After flirting with the idea of completely remaking the upper column (which I’m still not totally sure I’m not going to do) I ended up with it like this. The reason for changing the upper column would largely be to lose the ridiculously heavy column hanger bracket. However, that same bracket looks as though it’d make a nice place to put the gearchange so I might just keep it. If the bracket’s doing two jobs them I might forgive it for being heavy.
Once I’ve got the driving position sorted, and one thing I’m a bit wary about at the moment is where the upper seatbelt mounts are, I’m going to make a momentous decision. This is about whether I fit a front roll-hoop or not. I keep vacillating on this topic. On the one hand there’s safety and making it much easier to get in and out of the car, on the other there’s the fact that it’s heavier than any other similar car…
 While I’ve been doing these other things, I’ve been moving forward on bolting the suspension together. Here’s a detail view of the outer end of a lower wishbone where you can see the pushrod attachment and the outer spherical bearing. Note the presence of copper-slip all over the place. The problem with that stuff is that although it might well make it not seize later on, its get everywhere, or perhaps any grease does but the virulent colour of this makes it more obvious?
If you look hard at that photo, you can see the stainless steel top-hat bushes that are inserted into the rod-end. There’s a quite bewildering number of these supplied with the car. There’s a 100 bushes in total, in 6 different sizes. Luckily, they’re also all in separate labelled bags. I hope I don’t drop them…

Tim,
Is copper slip alright on spherical bearings? I was led to believe that you’ll accelerate wear by using it. I once did the same as you and had to wash the bearing out with petrol and re-grease once an engineer-friend saw what I’d done. Admittedly it was a different style of bearing but still….
TC
No idea. I do know, though, that this approach is strongly recommended by a friend who has massive experience as a motorsport mechanic. (Toyota F1, Toyota LMP, WRC, etc., etc). As such, I shall believe him…
Tim
Ah – at that level they are probably life’d to a weekend. 🙂
Sabre looks fab. Bodywork news to follow?
TC
On the CV joint the clip might have snapped in two! – had this on a mini in my younger days 20 Ton puller wouldn’t move it! Ended up having to use the angle grinder to cut through the CV joint down to the spline and then removed the offending clip. In my case the CV joint had lost it’s grease so was scrap anyway.
As it turns out Nick at AB Performance has managed to press out the CV joint using a tool that could reach through the middle of the diff. Apparently he got up to 30 Tonnes before it let go! He reckons that the problem was that at some point I’d got the suspension set so the driveshaft was too long (this is true, I remember have to adjust things) and hence the joint had been battered into the diff by the suspension! Apparently, the diff still seems OK though!
Copper slip is a temperature resistant anti seize compound,and is not a grease.
You are, of course, right and I do know that there’s far too much in that photo… I was going to say that it says “grease” on the pot but, now I think about it, I think it might be “assembly compound”… 🙁