 It’s been a while since I posted here, for which there’s a complicated reason that won’t fit into this margin.
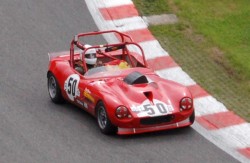
We’re working up now to the next race at Anglesey. As I write it’s warm and sunny outside; doubtless this presages a race weekend at Anglesey with horizontal rain. Having suffered hugely at Anglesey in the past I’m very wary about the weather there.
The big change to the car over the last couple of weeks is the appearance of various aerodynamic addons. I realised a while ago (clever, me) that with the move to class B I’m not limited to “standard” bodywork anymore. Consequently, I could experiment with additional aero devices. The RGB regs don’t allow anything having an airfoil cross-section, so means wings are out. However, there’s a large collection of other aero devices commonly used on race cars that are allowed. I’ve done a bit of reading about it, and also been talking to Tom about it. As he’s got an aerodynamics degree it’s about time he paid for his education…
So, the first thing was I made a splitter. This is a mostly horizontal ledge at the lower front of the car. The idea is that there’s a stagnation point in the airflow just above the splitter (like the streamline that stops right at the front of the airfoil above). At the stagnation point the velocity of the air is zero and hence, according to that nice Mr Bernoulli, the pressure’s highest. This pressure acts on the splitter and pushes the front of the car down. Of course, with something like the Fury the best I can hope to achieve will be to reduce the lift.
Of course, a splitter will likely also increase the drag; the aerodynamic texts, such as Katz, all talk about lift/drag ratios.
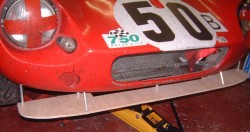
 So, I made something. Tradition is that splitters are made of plywood. I mounted a small lump of this under the front of the Fury’s bonnet. It’s attached to the bonnet with various small pillars which I tried to attach to the bonnet in a manner that would mean that the splitter wouldn’t tear off as soon as the car went above 60 MPH.
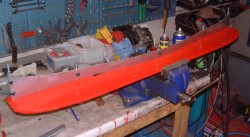
Of course, if it were just as in the photo here it wouldn’t do anything as there isn’t any reason for the airflow to stagnate. Hence, I blocked up the rear of the splitter with some aluminium.  Essentially making a wall up against the support pillars. I then used some red tape to cover up the ply so it didn’t look quite so naff. (Although, as you can see in the photo above, the bodywork is really starting to look rather tired. Whatever else happens to this car I’m going to have to respray it one day.)
As you can see in the photo on the right. The splitter is not actually attached to the car. That’s an odd thing to do, as you wouldn’t think it would work there. Ah well, I’ve got a cunning plan, you see…
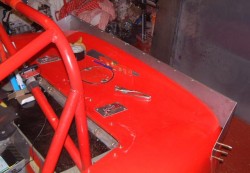
 In an ideal world the effect of the splitter would be to increase how well the front of the car worked which should tend to make the car oversteer, although along the way it might well go quicker anyway. If the car did oversteer then I’d really need something to make the rear of the car work better. As the RGB regs don’t permit a wing I’m going to have to make do with a small spoiler. So, I fabricated the aluminium beast that you see here.
This is quite a modest size, but some simple calculations say that it should have some effect. In an ideal world this will create some rear downforce (or reduce the lift) so as to counteract the oversteer induced by the splitter. Eagle-eyed readers will note that the spoiler is attached by Clekos in this photo. That’s because I wanted to take this off too, as part of the cunning plan.
So, what was the cunning plan then? Well, we were making one of our occasional forays to Spa for a trackday or two. My plan was to drive the car as it used to be and then attach the splitter. With luck I’d get barrow loads of oversteer which would go away when the spoiler was installed.
 To cut a long story short, that did seem to be the case. The other obvious effect was that running the splitter seemed to decrease braking distances dramatically. My original intention had been to then take the devices off again and see if things got worse again, as it was hardly a double blind test; not even single blind come to that. However, the second of the two Spa days was wet, really wet, and the general low-quality of the organisation of the trackday (not an organiser I shall be using again) meant that I got next to no useful track time. As I’ve seen before, the circuit was filled with really expensive cars which were incredibly incompetently driven.
So, with all that done it seems worth persevering. So, I shall leave the bits and pieces on for the next race meeting which is at Anglesey. In fact, I’ve spent a while this week checking over the car in readiness for this meeting. I just hope the weather here works out well.
The only problem with all this is that the bodywork mods seem to have created a vibration. I don’t think that it’s a fundamental problem, but I do worry about things like the propshaft after the fire of a couple of years ago. I shall have to be careful at Anglesey…

Respray – surely an opportunity to go back to the Red/Yellow diagonal split of seasons past? Much more distinctive.
Mr Moore seems to be neglecting his blog again, good job the likes of you and Bob are good at updating your public, both always a good read.
Nick
Well, true, I could go back to the old colour scheme. To be honest, the only reason I went all red was just to speed up the process.
I shall nag Adrian for you… 🙂
T
I know you aren’t allowed airfoils, but your pretty schematic is the wrong way up (for a car).
Incidentally, given the flexibility of the bodywork, it would be interesting to use your video footage of the bodywork to evaluate how much force you are actually getting from these devices. I suppose the front one will be tricky as its right next to the bonnet hinges so the bodywork is fairly rigid. Alternatively I suppose you could get suspension height information into your DL1 using one of those funking string resistor things. So many things to tinker with and so little time!
Matt