 The inlet manifold I mentioned above arrived today. Pleasantly, it was rather cheaper than
the price mentioned in the Real Steel catalogue, presumably because of the pound's continuing fall against the
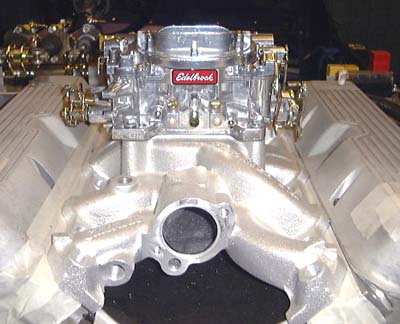
dollar. I placed it in place on the engine (I don't want to bolt it in yet because I want to get at the lifter
gallery when I finally get around to pressurising the oil system. Then, I bolted the carb to it, as that might
as well stay attached, although I'll probably have to take care that grot doesn't get in it.
The inlet manifold I mentioned above arrived today. Pleasantly, it was rather cheaper than
the price mentioned in the Real Steel catalogue, presumably because of the pound's continuing fall against the
dollar. I placed it in place on the engine (I don't want to bolt it in yet because I want to get at the lifter
gallery when I finally get around to pressurising the oil system. Then, I bolted the carb to it, as that might
as well stay attached, although I'll probably have to take care that grot doesn't get in it.
It's looks very shiny!
I was surprised to note that the inlet manifold blanks off some of the water ways in the heads. However, on inspection the original manifold does the same. Strange but true.
 As I've mentioned I bought Real Steel's Holley throttle cable thing so I needed to adapt
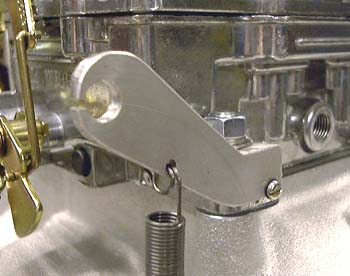
it to fit the Edelbrock. The main thing that seemed to be necessary was to stop the supplied bracket from moving.
So, I tapped a small hole into the carb body and fitted a small M3 bolt to hold it in place.
As I've mentioned I bought Real Steel's Holley throttle cable thing so I needed to adapt
it to fit the Edelbrock. The main thing that seemed to be necessary was to stop the supplied bracket from moving.
So, I tapped a small hole into the carb body and fitted a small M3 bolt to hold it in place.
This photo shows the bracket attached to the rear left of the carb, with the small bolt at the bottom corner.
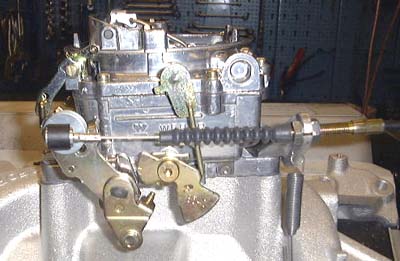 I had to hunt around a bit to find the best place to attached the cable itself to the throttle
linkage on the carb, but ended up with something that seems satisfactory. leaving it looking like this photo.
I had to hunt around a bit to find the best place to attached the cable itself to the throttle
linkage on the carb, but ended up with something that seems satisfactory. leaving it looking like this photo.
You will notice that I haven't worked out where to attached the return spring to yet. I think I'll need a bit more metal work for this.
I took the chance at this point to bung up the various things in the carb that I don't need, such as the vacuum port for the brake servo that I don't seem to have...
I also need to get a choke cable and attach it to the other side of the carburretor.
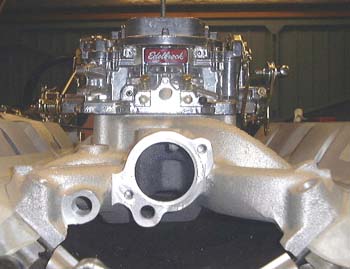 Finally, I looked around the manifold for a bit and my eyes came to
rest on the thermostat mounting on the front of the manifold. This sports the expected two mounting tapped holes
and an additional hole at the bottom which goes into the waterway. Unfortunately the thermostat cover from the
old engine does not cover this latter orifice, meaning a rather short life for the engine coolant.
Finally, I looked around the manifold for a bit and my eyes came to
rest on the thermostat mounting on the front of the manifold. This sports the expected two mounting tapped holes
and an additional hole at the bottom which goes into the waterway. Unfortunately the thermostat cover from the
old engine does not cover this latter orifice, meaning a rather short life for the engine coolant.
At first I wasn't sure what this hole was, but a bit of thought shows that it must be the thermostat bypass, through which water flows when the thermostat is closed. Unfortunately, my thermostat housing, from the original engine, doesn't admit the existence of a bypass which seems to exit the original inlet manifold at an entirely different place. However, the gasket pack that I bought does include a gasket that will fit this new mounting, so I guess I need to find a newer thermostat housing.
The other hole on the left, by the way, is for the coolant temperature sensor.
 I carried on with sorting the carburretor. This carb has a manual choke so I
went to a local motor factors and bought a very antique looking choke cable. I haven't seen one of these for years.
It's so awful that I'll have to arrange to hide it under the dashboard somehow.
I carried on with sorting the carburretor. This carb has a manual choke so I
went to a local motor factors and bought a very antique looking choke cable. I haven't seen one of these for years.
It's so awful that I'll have to arrange to hide it under the dashboard somehow.
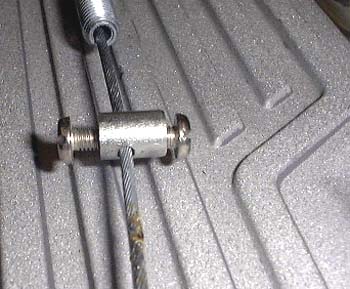
The other cable needed is the throttle cable. Having attached this at the carb end I needed to attach it to the throttle pedal. The Rush pedal is supplied pretty much unfinished. The manual suggests attaching the cable by cutting a slot down the end of the lever, drilling a hole through the lever and using a "solderless nipple" to attach the cable. The latter device is just a small barrel shape with a hole across it and a small screw to trap the cable.
Not having one of these (the Real Steel throttle cable has a little barrel on the end of it, but it wouldn't really hold in position on the throttle pedal) I decided to make one. So, I cut the shank part out of an M6 bolt, drilled a hole through it and tapped it to receive an M3 bolt into both ends (it's easier to tap that way). Here's the end result.
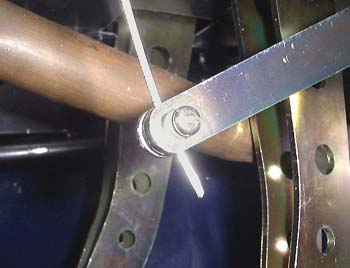 Having done that I modified the throttle pedal itself and then worked out where to drill
yet another hole through which to pass the cable. Here's the end of the lever on the pedal itself. In the background
you can see the steering column and the other two pedals.
Having done that I modified the throttle pedal itself and then worked out where to drill
yet another hole through which to pass the cable. Here's the end of the lever on the pedal itself. In the background
you can see the steering column and the other two pedals.
In retrospect I think I'll take the screws out of the nipple here and re-insert them with the aid of Loctite. The consequences of them coming loose aren't pleasant...
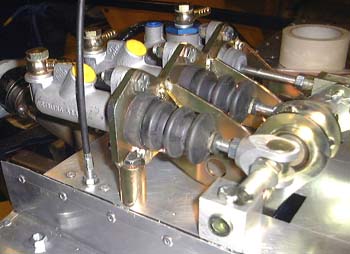 The cable now emerges just by one of the brake master cylinders, in fact it's
actually touching the cylinder, but should be alright all the same.
The cable now emerges just by one of the brake master cylinders, in fact it's
actually touching the cylinder, but should be alright all the same.
The next thing to do is to sort the choke cable. This will need a similar bit of engineering as the choke lever on the carb doesn't really have a suitable fitting on it.
 Progress is very slow at the moment, mainly because a) there's lots of real work to do
and b) it's bloody cold in the garage. All the same I managed to get a short time in there today.
Progress is very slow at the moment, mainly because a) there's lots of real work to do
and b) it's bloody cold in the garage. All the same I managed to get a short time in there today.
The first job was to fabricate a little bracket so that there was a return spring for the throttle on the carb. That was fairly easily done and although it doesn't look particularly wonderful, it works well. I think I'll also need to make a pedal stop for the throttle pedal itself, as I don't like the idea of my hefty right foot always being resisted purely by the carb itself.
 The next thing was to make something so that the choke cable could be attached to the other
side of the carb. This was fairly easily accomplished by drilling and tapping the actuation lever so that it could
take a clamping bolt, and tapping a useful looking boss in thr carb body (I think it's really for an electric choke)
so that I can hand a return spring off it. The only problem is, I haven't got a spring that's both weedy enough
and short enough, but this one gives the idea for now.
The next thing was to make something so that the choke cable could be attached to the other
side of the carb. This was fairly easily accomplished by drilling and tapping the actuation lever so that it could
take a clamping bolt, and tapping a useful looking boss in thr carb body (I think it's really for an electric choke)
so that I can hand a return spring off it. The only problem is, I haven't got a spring that's both weedy enough
and short enough, but this one gives the idea for now.
 Having wondered about what sort of water pump to get for a while, I ordered one from Real
Steel this week. I eventually decided to get a standard SD1 item, as getting the shorter (by about 0.4") P6
one would also necessitate a new crank pully. At the same time I ordered a thermostat housing from them to fix
the problem about the thermostat bypass mentioned earlier.
Having wondered about what sort of water pump to get for a while, I ordered one from Real
Steel this week. I eventually decided to get a standard SD1 item, as getting the shorter (by about 0.4") P6
one would also necessitate a new crank pully. At the same time I ordered a thermostat housing from them to fix
the problem about the thermostat bypass mentioned earlier.
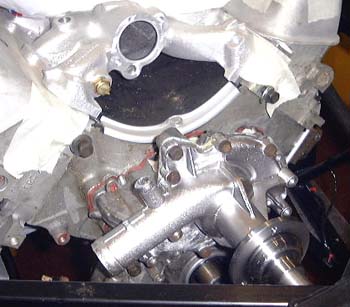
I bolted the pump on today, although I need to get some long bolts to finish the job. (A couple of the other ones sheared off when I took the pump off originally.)
Having done this I had a good think about the cooling system, and I think I can see how everything has to go now.
However, one problem here is the alternator. Having tried it is quite clear that the bracket I have for mounting the alternator is not going to fit, I need one that holds the alternator up high, just in front of the rocker cover. I'll need to see where to get one from.
The thermostat housing I got from Real Steel looks OK, although as the output pipe points rather steeply upwards I'm either going to have to cut and shut the housing, or arrange for a bleed nipple in the top hose. (Has anyone ever seen, used or fitted such a thing?)
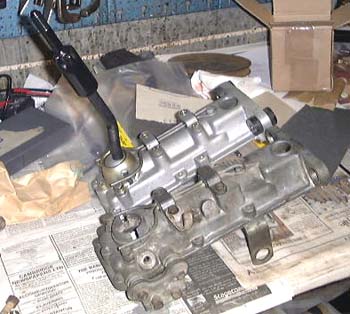 One other thing I ordered this week was a gearlever from
Ashcroft Transmissions, having found at that
they sold one along with a new remote for £30. I already have an old remote but why not use a new one instead?
However, when it arrived the remote was rather a different length from the other one, albeit it's nice and shiny.
I'll have to look and see which one is the best one to use.
One other thing I ordered this week was a gearlever from
Ashcroft Transmissions, having found at that
they sold one along with a new remote for £30. I already have an old remote but why not use a new one instead?
However, when it arrived the remote was rather a different length from the other one, albeit it's nice and shiny.
I'll have to look and see which one is the best one to use.
I also probably need to shorten that gear lever. It's got a sort of joint halfway up it and it might be that that's about the right length.
 Finally, having finally fitted the pedal box, I bent the brake pipes to fit the master
cylinders. While I was at it I installed an additional set of clips for the clutch pipe, which I haven't actually
got yet.
Finally, having finally fitted the pedal box, I bent the brake pipes to fit the master
cylinders. While I was at it I installed an additional set of clips for the clutch pipe, which I haven't actually
got yet.
 I'm a bit late writing this bit, but there has been very little progress over
the holiday season. With luck I can now (I write on Jan 1st) get into this again, although there's lots of skiing
to do.
I'm a bit late writing this bit, but there has been very little progress over
the holiday season. With luck I can now (I write on Jan 1st) get into this again, although there's lots of skiing
to do.
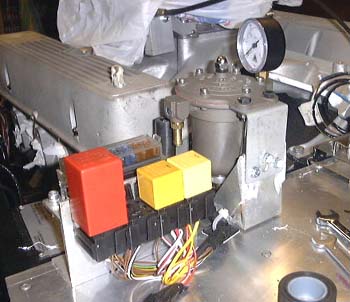
Anyway, I spent a short time mounting the fuel regulator that I bought a while ago on the scuttle. After making a bracket out of angle aluminium I discovered that it needed to strengthening somewhat and so I welded in a couple of diagonal braces. This is in aluminium note you, and I spent about 2 hours doing a bit of practice first. I'm quite proud of being able to do this at all, although I melted about 5 welding tips before I realised how to do it.
Unfortunately, I realised that the tails I have for the regulator are the wrong size, so I'll have to order some new ones.
You will notice that I got a regulator with a built in fuel pressure gauge, and you can get some idea of the size of the relays that I mounted a while ago. At least one person seemed to think it was all a couple of feet high!
in case you've got to this frame directly and can't get out, go here.