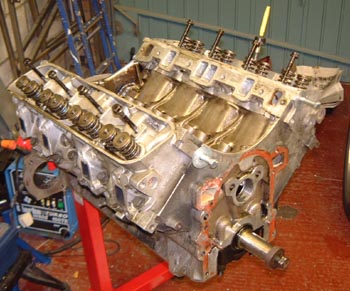
 Having spent a while musing over what I was going to have to do to get at the cam bearing, I finally
decided that the only sensible thing to do was to take the engine out. At least that way I could put it on the
stand and have easy access. So, I recalled my engine stand and hoist from the other garages that they'd wandered
off to an got stuck in.
Having spent a while musing over what I was going to have to do to get at the cam bearing, I finally
decided that the only sensible thing to do was to take the engine out. At least that way I could put it on the
stand and have easy access. So, I recalled my engine stand and hoist from the other garages that they'd wandered
off to an got stuck in.
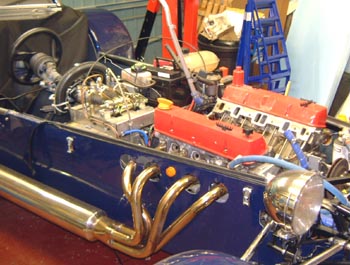
Needless to say, there's quite a lot to take off, and after the cooling system, scuttle, exhausts and so on were removed the car was looking quite small.
 One thing that I've been concerned about for a while is an obvious oil leak from the rear
of the gearbox. I had thought that it was probably a leak from around the selector rod, as this gearbox is known
for that. However, on looking closely, it doesn't seem to be coming from there. As far as I can see it's actually
coming from around the output shaft, which is a real bugger. I've had a look at the Haynes manual and there is
an oil seal in there, but it's not clear at the moment how to easily get at it. (The instructions are for completely
taking the 'box to bits, which isn't quite what I want.)
One thing that I've been concerned about for a while is an obvious oil leak from the rear
of the gearbox. I had thought that it was probably a leak from around the selector rod, as this gearbox is known
for that. However, on looking closely, it doesn't seem to be coming from there. As far as I can see it's actually
coming from around the output shaft, which is a real bugger. I've had a look at the Haynes manual and there is
an oil seal in there, but it's not clear at the moment how to easily get at it. (The instructions are for completely
taking the 'box to bits, which isn't quite what I want.)
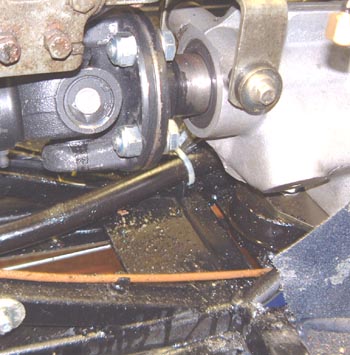
The rear of the gearbox is in this photo, and you can just about see the oil lying around. The gearbox mount (that round rubber thing at the bottom) was absolutely sodden with oil.
In some ways the biggest problem with the leak is that the tunnel panels don't really seal very well, especially as they've been off loads of times to fix the speedo. One thing that we'll do now it's all apart is to clean everything up and work out how to seal the panels a bit better.
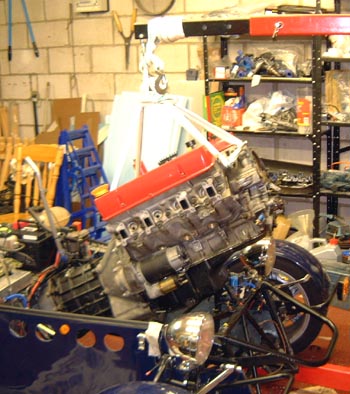 After a lot of faffing around, the engine finally came out. At least I'm getting
better at doing this sort of thing.
After a lot of faffing around, the engine finally came out. At least I'm getting
better at doing this sort of thing.
I could then get the engine down on the ground and I took the gearbox off and then unbolted the clutch. All of this, barring the oil leak mentioned above, still looks pretty good. Given the leak at the back I was a bit concerned that the front of the gearbox might be leaking into the bellhousing but it all seems fine.
So, I took the flywheel off and put the engine on the stand, back where it started off a long time ago!
Once there I could drain the oil and the last dregs of the coolant. One thing that happened a while ago is that one of the drain taps sort of fell to pieces. While the engine's out I'll try to buy a couple of new ones. I think they're a fairly standard BL part from the era that the engine dates from.
One problem with all this is that the bearing from the "nose" of the starter motor fell out, along with a few bits of phosphor-bronze. This is a bit dischuffing as the starter was a completely reconditioned part that I got sorted out at Lucas in Cambridge. I managed to bash the bearing back in but I'm not sure what to do about it. I might just leave it as the starter is fairly easy to take out, even with the engine in the chassis.
 I then turned the engine over and took the sump and the oil pick/baffle plate off. Underneath
there it looks pretty clean still. The insides of the pistons still look as if they're brand new in fact.
I then turned the engine over and took the sump and the oil pick/baffle plate off. Underneath
there it looks pretty clean still. The insides of the pistons still look as if they're brand new in fact.
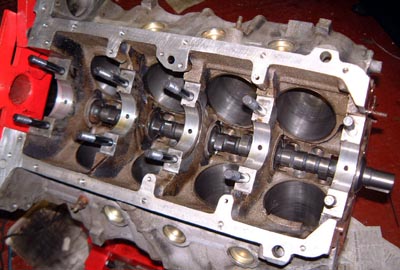
However, what is obvious is that access to the camshaft is just about non-existant. Obviously, I have to take the complete bottom end of the engine apart. In fact, probably the top end too as I'll probably need to remove the pistons to get suitable access too.
 Today I took the valve gear off so as to get closer to the camshaft itself. All the followers
and pushrods looked pretty good, although obviously run in. With that off I took the front cover and the timing
chain off and I could them remove the camshaft itself.
Today I took the valve gear off so as to get closer to the camshaft itself. All the followers
and pushrods looked pretty good, although obviously run in. With that off I took the front cover and the timing
chain off and I could them remove the camshaft itself.
The cam looks fine, although again obviously run in. The wear that I could see looked pretty even so presumably it's normal. I checked the centre bearing (there are five) for ovality as much as I could but it seemed fine. Unfortunate my micrometer isn't big enough to go around the cam bearing so I could only use some vernier calipers.
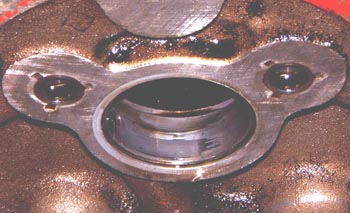 As for the cam bearings then they look pretty much ok. This is the front-most one and although
it's obviously been used it's very smooth and feels fine. The marking does make you wonder if there's been a shortage
of oil at some point though. Perhaps this could be a consequence of the Donington
episode as remarked on earlier?
As for the cam bearings then they look pretty much ok. This is the front-most one and although
it's obviously been used it's very smooth and feels fine. The marking does make you wonder if there's been a shortage
of oil at some point though. Perhaps this could be a consequence of the Donington
episode as remarked on earlier?
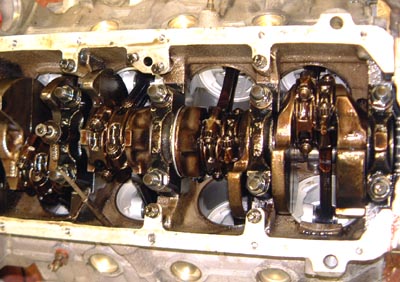
 The most interesting thing, though, is the centre cam bearing. This is the one that appears
in the earlier photos.
The most interesting thing, though, is the centre cam bearing. This is the one that appears
in the earlier photos.
With the cam itself removed I could manage to get an oily finger in to feel around the edge of the bearing. As I suspected before there is a small dinge (how do you spell that?) in the edge of the bearing, presumably caused by the follower bashing into the bearing.
I now suspect that this is the most likely source of the rattle when the engine was cold. The follower was bashing on the bearing and knocking. I guess the reason it stopped when the engine was warm is that that everything moved a bit as it heated up and that caused the gap between the follower and bearing to increase very slightly.
Of course, the big issue is why this happened in the first place. The only idea I have is that when I had the oil surge issue at donington then there was a shortage of oil to the cam bearings. If one of them had momentarily seized onto the cam itself then it might have screwed around to this position. To be honest this hypothesis doesn't really hold water as the cam itself would surely show some signs of this escapade and it looks fine. Furthermore, if the bearing did seize onto the cam then it doesn't explain why that should cause it to move.
Anyway, tomorrow I shall phone up Abbey Sportscars, who are a fairly recent appearance on the V8 supplier network and of whom I've heard quite good things. I'll ask them about what they think I should do. While I'm on the phone they are advertising front timing covers (of which the oil pump housing is an integral part) for rather less money than anyone else that I've found. I had wondered about buying a new cover as that might well allow for rather higher oil pressures than I'm getting.
 I did phone up Abbey Sportscars and had a very interesting chat on the phone with someone
who told me all sorts of useful stuff. Highlights were:
I did phone up Abbey Sportscars and had a very interesting chat on the phone with someone
who told me all sorts of useful stuff. Highlights were:
- He'd never seen a cam bearing dislodged on anything other than the end (1 and 5) bearings. He reckoned that just pressing it out and replacing it would be the best strategy.
- After talking to him about whether I should buy a new front cover (to try and get the oil pressure up) he reckoned that I'd be better off having a good look at all the bearings (to see if any other damage is causing the pressure loss) and perhaps machining the pump cover down if it was worn.
However, when I tried to buy some stuff off him he was strangely reticent. They don't take credit cards and he said he'd go an check on the stock and phone me back.
He never did.
So, I suspect they're very knowledgable and capable, and he was very pleasant and helpful on the phone; but it's a bit of a pain trying to deal with a company that isn't really interested in taking your money!
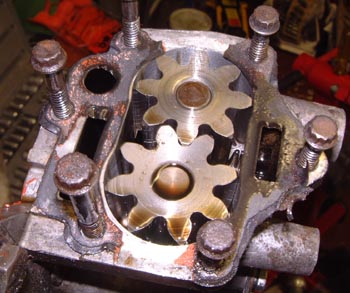
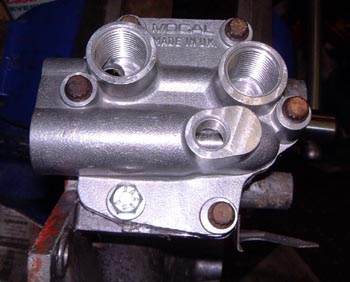
However, armed with his advice I started today with measuring the wear in the oil pump, as seen here. I replaced the gears in the pump when I built engine originally. Measuring the wear is done by putting a straight edge across the gears and measuring how proud that is of the pump housing. The pump wears as that measurement reduces (as the gears grind into the top (bottom in the photo) of the pump. The required gap is between 0.05mm and 0.15mm. In my case it worked out to 0.14mm, which seems to be pretty good.
One problem is that the sides of the housing are fairly well scored, as if the pump has at some point been pumping sand. I guess that can't be too good for it. However, I'll stick with it for now...
So, today I phoned Real Steel and Think Automotive and ordered some stuff. This included:
- New cam bearings
- Gasket set
- New main and big end bearings. (Just in case when I open it up...)
- Some plastigage to actually check the bearing clearances.
- A Mocal pump cover, as discussed earlier.
- Some hose fittings to fit the oil cooler. Just for now I've decided against filling an oil-stat. I'll see how the oil cooler performs and then see about fitting one.
- A couple of maintenance items, such as a spare distributor condensor and a replacement air filter.
 In the evening, I continued dismantling the engine. I got a bunch of pistons
out nice and easily. There's actually a surprisingly large amount of carbon build-up in the top of the engine.
I suspect this is a result of it being a rather old design and, although it hasn't done many miles, it's mostly
been with my foot pressed fairly close to the floor.
In the evening, I continued dismantling the engine. I got a bunch of pistons
out nice and easily. There's actually a surprisingly large amount of carbon build-up in the top of the engine.
I suspect this is a result of it being a rather old design and, although it hasn't done many miles, it's mostly
been with my foot pressed fairly close to the floor.
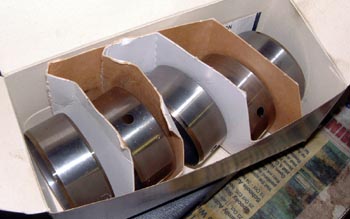
I'd had to guess what the crankpin sizes were when I ordered the bearings earlier today. I was pretty sure the crank had not been reground before I got at it so the journals should all be 10 thou undersized. The crank pins are supposed, as standard, to be 2" in diameter. (Being American originally, most of the major dimensions are fairly exact imperial sizes.) My measurements came to 1.99", which is indeed 10 thou undersized.
However, all the bearings that I've seen so far look in absolutely perfect condition, although it will be useful to use some plastigage to find out what the bearing clearances really are.
At least while I'm doing all this, I have wonderful access to the engine compartment of the car, on account of there not being an enging in the way. I can use the time to do some tidying up and doing a couple of modifications. For example, I would like to fit some sort of catch tank, although probably only of the squeezee bottle variety.
 This weekend I carried on dismantling the engine and finished off cleaning everything up
again, although that wasn't anything like the job I did when I first took the engine to pieces.
This weekend I carried on dismantling the engine and finished off cleaning everything up
again, although that wasn't anything like the job I did when I first took the engine to pieces.
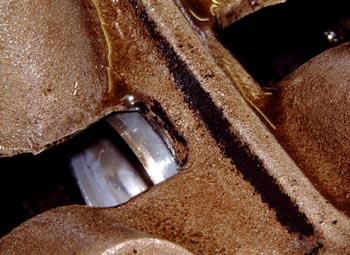
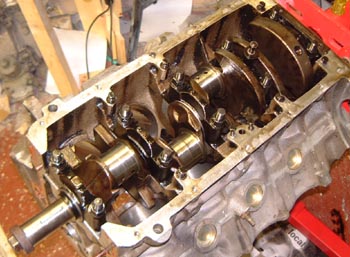
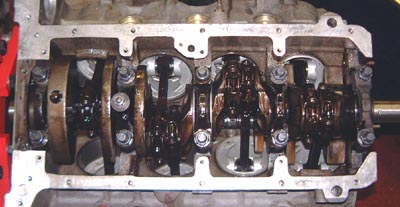
Taking the main bearings out was interesting. Mainly because there was some obvious wear on a couple of the bearings. The one here is half of the number 4 main bearing.
The wear isn't the end of the world, the bearing surface is roughened and there are a couple of score marks, which aren't really visible in the photo, all round the bearing. Luckily, the crank itself seems unaffected and its bearing surfaces are still shiny.
It's likely that the accumulated effect of this wear is the real cause of the drop in oil pressure that I got at Donington, although that was all compounded by the inaccurate pressure gauge readings. Hopefully all these things I'm doing will help redress the issues. (As I'm now completely rebuilding the engine then something must happen...)
The other thing I spent a while looking at was the oil leak from the gearbox. I stood the gearbox on its tail end (not an easy trick give the weight of the LT77) and looked to check where the oil was coming from. As I said a while ago I had thought it was coming from the seal around the output shaft, but looking closely it looks as though it's coming from the seal that I fashioned ages ago to plug up the un-needed hole for the speedometer drive. Apparently, I need to make something better, although at the moment I can't figure out what.
 Some bits started arriving today, including the oil pump cover. It's interesting
as the "inside" of it (the bit that's next to the gears) is completely flat, even those the gears stick
out by 0.14mm on mine. Obviously the thickness of the gasket has to come off that but it's all still clearly very
tight.
Some bits started arriving today, including the oil pump cover. It's interesting
as the "inside" of it (the bit that's next to the gears) is completely flat, even those the gears stick
out by 0.14mm on mine. Obviously the thickness of the gasket has to come off that but it's all still clearly very
tight.
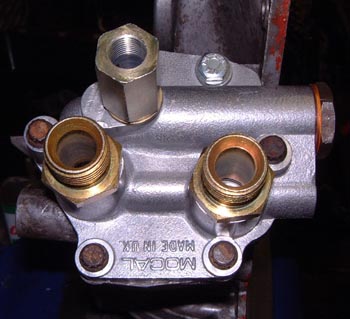
I put the pump gears back into the pump housing and packed them with Vaseline to help the priming of the pump. I then bolted the cover on and it looked like the picture here. One issue is that I realised that the tee piece that I already have for connecting both the pressure sender and the low pressure warning light needs a proper sealing washer, so I phoned up Think Auto again and ordered one.
At least the thing is starting to go back together again, although I need to find someone to actually fix the cam bearings for me and haven't found time to do so yet.
 I've had a frustrating couple of days. First of all I took the block up to Cambridge Rebores
who did the original work on the engine to ask them to push the new bearings in for me. The chap there said that
he though, from some marks underneath the main bearings, that the mains had been rotating in the block as well
as at least one of the cam bearings. As such the block was essentially scrap and I would have to source a new one.
I've had a frustrating couple of days. First of all I took the block up to Cambridge Rebores
who did the original work on the engine to ask them to push the new bearings in for me. The chap there said that
he though, from some marks underneath the main bearings, that the mains had been rotating in the block as well
as at least one of the cam bearings. As such the block was essentially scrap and I would have to source a new one.
I went away wondering what to do but the more I thought about it, the more I thought I was having the wool pulled over my eyes. Firstly, the marks on the block seem to just be some sort of discolouration. Secondly, if the bearings had been rotating they wouldn't have all been in the proper place in the bearing caps. In fact, they wouldn't have been slightly tricky to get out of there due to being jammed in place so firmly. (I had to use a little screwdriver behind the little locating lug in the bearing to get them out.
I decided that really Cambridge Rebores really would have preferred me to get another block so they could charge me lots of dosh for reboring it. I remember when I first got the engine work then they did a couple of things that I didn't ask for and charged me way over the top for the bearings that they sourced themselves. (About 3 times what I can get them from Real Steel for.)
So, I decided to talk to some other people. I spent a while today phoning round a bunch of engine places. Some of them were completely useless, ranging from no answer to "sorry I would have to source the bearings myself, as I might damage one that you've sourced" for which the translation is "if you've got the bearings yourself then I can't charge you way over the odds for them". The most useful people were St Ives Engine Services who, although they said they were dead busy and couldn't fit it in, talked about the way to do it. The chap there suggested that rather than using a press it should be possible with a dolly of the right size and a threaded rod to pull the dolly through the bearing housing. This is an obvious suggestion really.
 So one possibility is to get some dollys turned to exactly the right dimensions.
(Unfortunately there would have to be five as each of the bearings is a different size.) Musing about it later
on, it occurred to me that I might be able to get a collection of sockets to do the job, or perhaps just take a
while carefully filing a piece of steel plate to the correct size.
So one possibility is to get some dollys turned to exactly the right dimensions.
(Unfortunately there would have to be five as each of the bearings is a different size.) Musing about it later
on, it occurred to me that I might be able to get a collection of sockets to do the job, or perhaps just take a
while carefully filing a piece of steel plate to the correct size.
So the plan at the moment it to try and do it with the aid of a bolt to heave on the bearings. We'll see at the weekend how we get on.
Also, today I got some gender bender pieces from Think Auto so I could make the fittings on the oil pump have a male connection which is what I need. I also got the sealing washer for the tee piece so could connect up all the ports on the pump cover.
 I went to MacKay's today and bought some bits for trying to shift the cam bearings.
This included a couple of very long M12 bolts and a couple of sockets to try and push some of the bearings out.
I went to MacKay's today and bought some bits for trying to shift the cam bearings.
This included a couple of very long M12 bolts and a couple of sockets to try and push some of the bearings out.
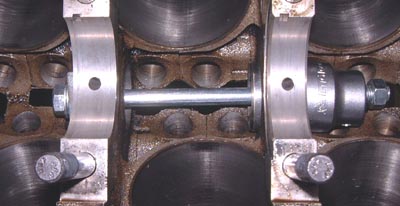
When I got home I knocked out the core plug from the rear of the block so that I could get access to the rear of the camshaft "tube". And, with the aid of lump of steel cut out to just hold one end of the aforesaid bolt, and a pile of washers the whole thing was assembled and looked like this photo.
 I then tightened up the bolt and the bearing moved easily out of its housing!
Success!
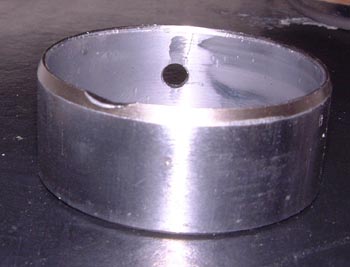
On looking at the number 3 bearing, the supposed source of the original problem, it looked like this photo. You can clearly see the damaged lip of this bearing where the follower has been whacking the bearing until the clearances changed as the engine warmed up.
I took another couple of bearings out, but I need another socket, slightly smaller this time, before I can get the other two out. After that pulling the new bearings in should be quite easy, I'll just have to be careful about aligning the oil holes.
Of course, the big issue about all this is whether this whole process has damaged the engine block to such an extent that the bearings will just move again. As far as I can see I'll just have to try it and see how it goes. If it goes horrible on me then I'll have to indulge in major engine surgery work.
 Friday was the Dax open day. It was a wonderful day with lots of nice cars,
unfortunately not including mine! Perhaps the best bit of the day was another Rush builder saying that the Dax
manual wasn't really much use and that he used mine and Trevor Turner's websites instead!
Friday was the Dax open day. It was a wonderful day with lots of nice cars,
unfortunately not including mine! Perhaps the best bit of the day was another Rush builder saying that the Dax
manual wasn't really much use and that he used mine and Trevor Turner's websites instead!
After that it was back to the engine. Following the same technique I managed to get all the cam bearings out and, after making some different plates to shove the bearings in, got the new bearings in. I took some care to line up the oil feeds, checking on each one that the oil hole really did go into the oilway in the block.
It was now the moment of truth and I tried to get the camshaft back into position. It was a bit stiff at the beginning, probably because I'd slightly turned the soft edges of the new bearings. But after a couple of turns it spun around nicely. I wonder if it will work properly?
 After that I got the crank back in. I checked the bearing clearances with Plastigage
and it came into the recommended tolerances of between 0.001" and 0.0025". That's good as it means that
the limited oil pressure of the Rover V8 won't just be sloshing into the sump.
After that I got the crank back in. I checked the bearing clearances with Plastigage
and it came into the recommended tolerances of between 0.001" and 0.0025". That's good as it means that
the limited oil pressure of the Rover V8 won't just be sloshing into the sump.
Fitting the pistons was the usual tedious messing about, doubly so as there are eight of them!
With that in I assembled the oil pickup, or non-pickup as it's been in my case! I've been musing about this business of baffled sumps, as I seem incapable of getting one out of John Eales. I think I'll have to talk to someone else, perhaps Abbey Sportcars. In the meantime I might try to make a simple job like the one that's described on Ian Crocker's page. (The horizontal baffle one!) Problem is, that needs at least one hole in the rear of the sump. (I don't think I should attempt to weld a bracket to the sump, as I'm sure I'd just blow a hole in it.) That means I shall have to make sure it doesn't leak somehow; perhaps with some of the sealing washers that are used for brake lines, or some JB Weld.
 After all that I re-installed the timing chain, using the central one of the
three timing positions provided by the Cloyes roller chain set. Finally, for today at least, I reinstalled the
heads and all the valve gear, using some new head tin head gaskets. (There are two head gasket types available
for the Rover V8. The original tin ones and later composite ones. The problem with the later ones is that they're
quite thick and reduce the compression ratio substantially. I'd prefer to stick with the tin ones because of this
unless I absolutely have to.
After all that I re-installed the timing chain, using the central one of the
three timing positions provided by the Cloyes roller chain set. Finally, for today at least, I reinstalled the
heads and all the valve gear, using some new head tin head gaskets. (There are two head gasket types available
for the Rover V8. The original tin ones and later composite ones. The problem with the later ones is that they're
quite thick and reduce the compression ratio substantially. I'd prefer to stick with the tin ones because of this
unless I absolutely have to.
At least this thing is now starting to look like an engine again. I'll try to repatriate my engine hoist tomorrow I think..
 I refitted the front cover first, this time missing off the gasket sealant that
I put on last time due to the exhortations of the Haynes manual. (It's the red stuff that you can see in the photo
above.) I never like the stuff and if it leaks I'll worry later.
I refitted the front cover first, this time missing off the gasket sealant that
I put on last time due to the exhortations of the Haynes manual. (It's the red stuff that you can see in the photo
above.) I never like the stuff and if it leaks I'll worry later.
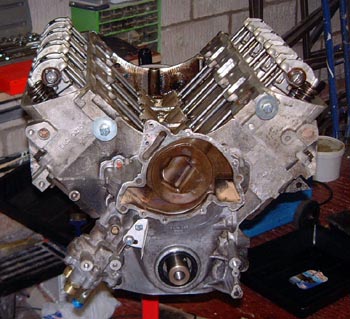
With the front cover on it looks more like an engine and after I put the rocker covers on and put the valley gasket in place it looked pretty much complete. However, I need to get the flywheel and clutch back on, but for that I need the engine hoist back.
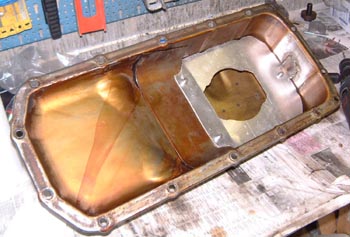 I then turned to baffling the sump, as discussed earlier. I made an aluminium
plate that fits inside the sump at the level of 3 litres of oil, on the assumption that about 2 litres of oil is
charging around the rest of the engine. This plate fits pretty snugly inside the sump and has a hole that only
just fits around the oil pickup. It needs to be hooked over the pickup so taking it off in situ is going to be
a bit of a fiddle.
I then turned to baffling the sump, as discussed earlier. I made an aluminium
plate that fits inside the sump at the level of 3 litres of oil, on the assumption that about 2 litres of oil is
charging around the rest of the engine. This plate fits pretty snugly inside the sump and has a hole that only
just fits around the oil pickup. It needs to be hooked over the pickup so taking it off in situ is going to be
a bit of a fiddle.
The plate is mounted on rivnuts which are attached to the existing braking baffle on the front of the sump and to a steel bracket that I welded into the rear of the sump. I was a bit wary about welding in the sump, but eventually decided that running the risk was preferable to having to block up some bolt holes which would definitely leak.
This sump is obviously a half way house, but should at least be better than the standard sump. Hopefully it won't be too long before I found out how well it works.
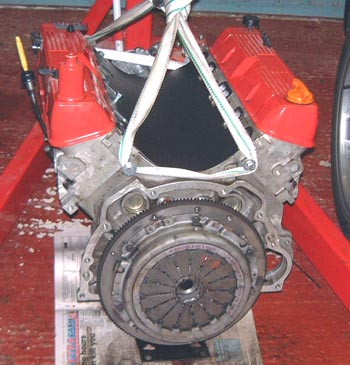 Having got the hoist back I could get the engine off the stand and get around
the back of it. Once there, I refitted the core plug that goes at the rear of the camshaft "tunnel",
fitted a new main rear crank oil seal and refitted the flywheel and clutch.
Having got the hoist back I could get the engine off the stand and get around
the back of it. Once there, I refitted the core plug that goes at the rear of the camshaft "tunnel",
fitted a new main rear crank oil seal and refitted the flywheel and clutch.
All of that means that once I have had a look at fixing the oil leak in the gearbox I can see about re-mating the engine and gearbox. However, before I put it all back into the car, I want to work out some mountings for the oil cooler, as I'm sure it'll be easier before the engine's in. I also want to clean up the chassis a bit, especially the oil that's leaked from the gearbox already.
in case you've got to this frame directly and can't get out, go here.