Having thought for ages about an engine, I have finally decided what to do. The cheapest way to do all this is probably to get a complete engine from the likes of Dragon Engines. However, this is also the most boring, and would in any case have to be dismantled somewhat to fit a better cam and the carbs I need. Hence, I've decided to go for the rebuild it myself option and therefore need a cruddy old SD1 engine to start from.
 So, I spent a while scouring the cheap ads looking for a cheap V8. Yesterday, there was
one advertised in Loot which turned out to have been an engine that somewhat
had taken out of an SD1 in order to build a car, but had never got further than under a bench in the garage. The
price of £75 seemed reasonable for what could well turn out to be a claggy old pile of junk.
So, I spent a while scouring the cheap ads looking for a cheap V8. Yesterday, there was
one advertised in Loot which turned out to have been an engine that somewhat
had taken out of an SD1 in order to build a car, but had never got further than under a bench in the garage. The
price of £75 seemed reasonable for what could well turn out to be a claggy old pile of junk.
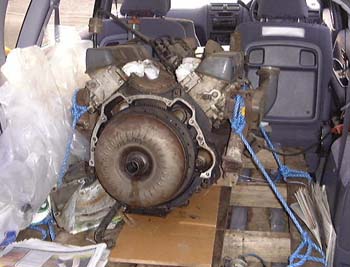
I therefore drove off to Leicester and picked it up. It was actually advertised along with an auto box which is a slight pain, as I think it means that I need a new flywheel. However, I should be able to find one easily enough. The chap I bought it off had a garage full of uncompleted projects and this engine was really just another one. Having said that he had a hoist, it turned out that he just had a block and tackle which was useless for lifting the engine into the back of the car. I rather surprised myself as he and I were able to lift the engine straight into the back. Perhaps there is something in this alloy block business after all.
In this picture, the big lump on the flywheel is the torque converter. This is actually the first time I have seen one of these.
Driving back home was pretty easy, as was using out recently acquired crane to get the engine out of the car. I had also bought an engine stand from Machine Mart and the engine was mounted on that, after taking off the flywheel and torque converter.
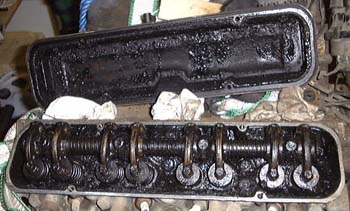 The end of the day was spent having a little look around the engine. It looks basically OK, but taking
off one of the rocker covers reveals a horrible sign of an engine that hasn't had its oil changed for a long time.
This is probably not the end of the world, as by the time everything has been exchanged/rebuilt all the moving
parts will have been renewed in any case.
The end of the day was spent having a little look around the engine. It looks basically OK, but taking
off one of the rocker covers reveals a horrible sign of an engine that hasn't had its oil changed for a long time.
This is probably not the end of the world, as by the time everything has been exchanged/rebuilt all the moving
parts will have been renewed in any case.
However, I shall start taking the thing to bits. Tomorrow we're going to the Newark show.
All I did today was to drain the "oil" out of the engine. There quite a lot of it, which I guess is good, but I've never seen oil come out in lumps before. I don't know whether the lumps are due to it sitting around for ages or, more likely, just due to never changing it. All the same, I rotated the engine on the stand so that the drain plug was right at the bottom and left it overnight.
I carried on dismantling the engine, having cleared away all the lumps. On dismantling the water pump, one bit of it had broken off and was jammed inside the water-way that left the pump, so that's one bit that will have to be replaced.
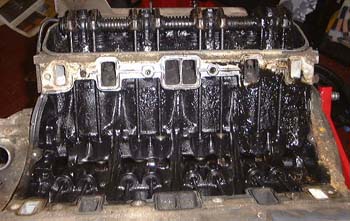 I also removed the inlet manifold/valley gasket. It wasn't quite as grim here as I thought it was going
to be. As expected for the age of the engine (about 1980) the block can be seen to be the design before Rover stiffened
up the casting. (One clue is the thickness of the webs that connect the two cylinder banks.) This might be a concern
if I end up rebuilding based on this particular block, but perhaps not if I exchange it for a later one.
I also removed the inlet manifold/valley gasket. It wasn't quite as grim here as I thought it was going
to be. As expected for the age of the engine (about 1980) the block can be seen to be the design before Rover stiffened
up the casting. (One clue is the thickness of the webs that connect the two cylinder banks.) This might be a concern
if I end up rebuilding based on this particular block, but perhaps not if I exchange it for a later one.
I actually took out a couple of the plugs to see what they looked like and they were actually rather good looking, so perhaps the all-encompassing feeling of grot doesn't extend to the combustion chambers themselves. After I pop off one of the heads I'll see, but the next job is the timing cover to see what the timing gear is like.
Watch this space.
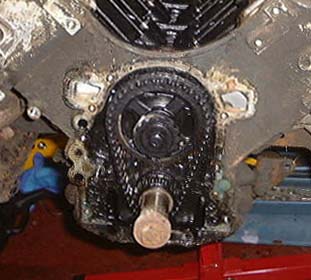 I'm getting into this now, and Tom is learning all about what goes on inside engines. This evening
we took the timing cover off, exposing a very slack timing chain, having first removed the oil pump and its housing.
The oil pump itself seemed to be full of congealed oil lumps, making it all really rather unpleasant.
I'm getting into this now, and Tom is learning all about what goes on inside engines. This evening
we took the timing cover off, exposing a very slack timing chain, having first removed the oil pump and its housing.
The oil pump itself seemed to be full of congealed oil lumps, making it all really rather unpleasant.
I've been trying to keep all the bolts with some idea of where they came from. The Haynes manual is very specific that all bolts that are removed from the aluminium part of the engine must be cleaned immediately as they have some thread sealing compound on them that hardens when exposed to air. This sounds a bit like mumbo-jumbo but I'll give it the benefit of the doubt. It slows everything down though.
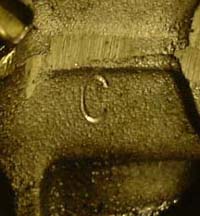
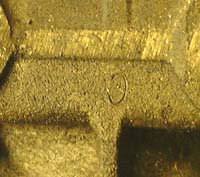
 There are a number of casting marks on the block that are being exposed by all this work. These are
some of them that are the right of the block, there is also a large (what looks like) letter C stamped into the
block.
There are a number of casting marks on the block that are being exposed by all this work. These are
some of them that are the right of the block, there is also a large (what looks like) letter C stamped into the
block.
I'm not entirely sure what these marks mean, if anything other than boring old foundry numbers of some form. I'll have to look in the various reference books that I've got.
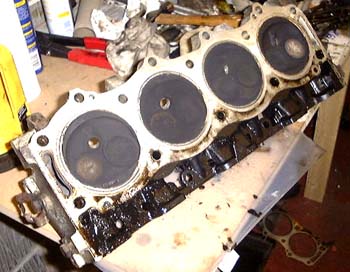 Finally, I removed the right hand head. (It still seems odd that there's another
one.) The while construction of the engine is odd, come to that. The head almost seems transparent, with a large
hole into the lifter gallery underneath it. It's also positioned almost to the side of the cylinders in order for
a part of it to overhang the same gallery.
Finally, I removed the right hand head. (It still seems odd that there's another
one.) The while construction of the engine is odd, come to that. The head almost seems transparent, with a large
hole into the lifter gallery underneath it. It's also positioned almost to the side of the cylinders in order for
a part of it to overhang the same gallery.
The head itself is certainly carbonised, but the combustion chambers look pretty much OK really, although the ravages in the ports are still to be looked at.
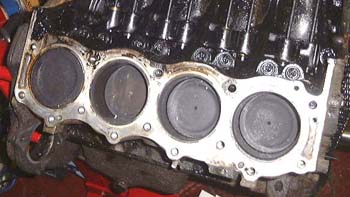 The cylinders look remarkably good. There some carbon around the top of the
bores, as would be expected, but there is no serious wear ridge that my fingers can detect that has been exposed
by the rings.
The cylinders look remarkably good. There some carbon around the top of the
bores, as would be expected, but there is no serious wear ridge that my fingers can detect that has been exposed
by the rings.
I need to start thinking about what has to happen to this pile of scrap metal that I'm producing. I suspect the first thing to do is to go and talk to an engine builder somewhere about how to proceed. I'm tempted to go and see John Ellis, as mentioned before, as in early discussions he emphasised his ideal of just doing the machining that customer's wanted, and also the possibility of sitting and having a chat over a cup of tea. It requires a drive up to Nuneaton though. Perhaps I'll try and get the block itself cleaned up before doing this in case I end up leaving it with him.
 I've spent a fair bit of time the last few days finishing off dismantling the
engine completely. Now I have to work out what to do, as mentioned above. It's taken me just a week to reduce the
engine to, just about, its constituent parts.
I've spent a fair bit of time the last few days finishing off dismantling the
engine completely. Now I have to work out what to do, as mentioned above. It's taken me just a week to reduce the
engine to, just about, its constituent parts.
At the end of all this, the engine looks in reasonable nick. The block is certainly dirty as hell, but when you actually get down to them all the bearing surfaces look OK. There must be something good about the design of this engine if it can survice with quite this quantity of coagulated oil all over the place and still run. The bottom of the sump had at least 0.5" of oil residue in it, even after all the lumps had come out.
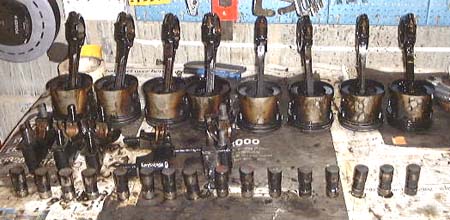
I now have this pretty collection of pistons and the like sitting on the bench. The things at the front are the tappets/cam followers/lifters. (Choose whichever term you prefer!) The tappets have the recommended dished wear pattern on them, although some have quite a few pits which would not be good in the long term. The pistons, big end bearings and main bearings all look quite fair too. However, if I end up with going for a 3.9 overbore all this will have to be renewed anyway.
 The
rod bolts have ends on them that look like this. The dash on the end of the bolt, according to my book, identifies
this as a rod from an SD1 engine. Strangely, the rods themselves appear to be of two slightly different sorts,
although it could just be that the act of balancing them has left some of them with more material having been ground
away.
The
rod bolts have ends on them that look like this. The dash on the end of the bolt, according to my book, identifies
this as a rod from an SD1 engine. Strangely, the rods themselves appear to be of two slightly different sorts,
although it could just be that the act of balancing them has left some of them with more material having been ground
away.
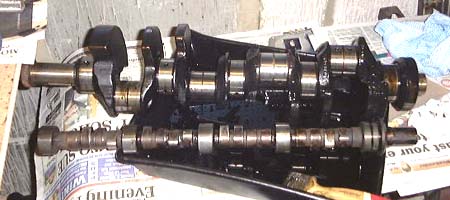 The crankshaft looks pretty clean, with just some slight wear noticeable on the journals.
I really don't know whether this is enough to warrant regrinding it or whether it should just be put back together
with some new bearings. The camshaft, also in this picture, looks OK but worn. However, I will definitely change
this for something a bit more exciting in any case.
The crankshaft looks pretty clean, with just some slight wear noticeable on the journals.
I really don't know whether this is enough to warrant regrinding it or whether it should just be put back together
with some new bearings. The camshaft, also in this picture, looks OK but worn. However, I will definitely change
this for something a bit more exciting in any case.
One slightly odd thing is that this crankshaft appears to have a spigot in the end for the gearbox input shaft. As there was an automatic transmission attached this seems rather odd. I wonder if it's the right size? I suppose it's possible that the spigot was fitting in any case.
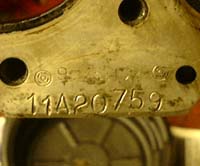
 The left hand side of the block, like the right hand
one above, has various marks stamped on it. The first of these is the engine number and the compression ratio (9.35:1
at the moment). The other one is another large letter C. I wonder if this could indicate a rebore having taken
place at some point in the past??
The left hand side of the block, like the right hand
one above, has various marks stamped on it. The first of these is the engine number and the compression ratio (9.35:1
at the moment). The other one is another large letter C. I wonder if this could indicate a rebore having taken
place at some point in the past??
Two things I haven't touched at all are the heads themselves and the rocker assemblies--although I suppose that's really just one thing. The reason for this is that I think I will just replace these outright. There are various suppliers, such as Real Steel, who do ported and uprated heads, and replacing the rocker assemblies seems to be a sensible precaution.
I've been talking to people and looking at various catalogues and coming up with what I want to do with this engine now I've got it in bits. I've ended up thinking that I'll rebuild it in a reasonable, but not outrageous, manner. The intended specification is as follows:
- Cylinders rebored by 0.020", but I've decided to keep the capacity at 3.5 litres.
- Vitesse pistons which will take the compression ratio to 9.75:1. The only concern with this is whether such a ratio could lead to pinking on modern fuel. I'll have ask a bit more.
- Viper Hurricane camshaft.
- Real Steel stage 2 heads.
In order to do this I'll need to order a stack of stuff from Real Steel, who'll I'll try and phone tomorrow. I also need to get some machine work done. I phoned up local company recommended by someone, Cambridge Rebores in Burwell, and chatted to them today. They sounded, at least, as if they knew what they were talking about so the next thing to do is to get the stuff from Real Steel, in particular the new pistons and then take the bits along to Cambridge Rebores. They have the facilities to "hot tank" the block which should at least make it all look nice, rather than the oily thing it is at the moment.
A couple of unsure regions at the moment are the ignitiion and carburation systems. A lot of people fit the Mallory dual point distributor. However, I have an antagonism to something that relies on points, which are a truly gruesome device. Apparently many respected engine builders stick with the standard distributor so I think I'll go that way, at least in the short term.
The other issue is carburation. There appear to be two obvious choices here: the Weber 500 and the Holley 390. There is a lot of vociferous information about supporting one or other of these devices which leaves me unsure which way to go. I had wondered about retaining the standard SU carbs. I've always rather liked these devices as their simplicity and effectiveness appeals to the engineer in me. However, I suspect they would stick up too high anyway...
Rats! I phoned Real Steel to see whether they had the bits I wanted in stock. They have most of the bits except the most important, in that their Stage 2 heads no longer exist as the chap that did them for them has apparently left! This leaves me in a bit of a quandary, as there are a limited number of suppliers of such things around.
Martin Hill (of the Race Technology web site amongst other establishments) emailed me to suggest that I looked into getting the parts from Rimmer Bros, who are suppliers of V8 bits as well as everything else for SD1s. A while spent with their catalogue in the evening showed that the Real Steel prices were rather better than the Rimmer ones. Howver, embedded in their catalogue was some details of stage 2 heads. These look rather nice in that they include bigger valves than many other, and duplex springs. However, it's difficult to know whether they are actually any good. Perhaps I'll phone them next week for a chat.
in case you've got to this frame directly and can't get out, go here.