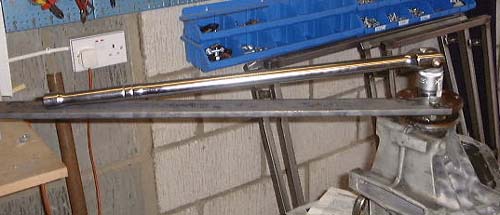
 I went off to Mackay's and bought a large 3/4" drive socket for the differential
pinion flange nut, and a large piece of steel to bolt to the flange. It ended up looking like this.
I went off to Mackay's and bought a large 3/4" drive socket for the differential
pinion flange nut, and a large piece of steel to bolt to the flange. It ended up looking like this.
After that it was simple, the nut just gave in and came off gracefully.
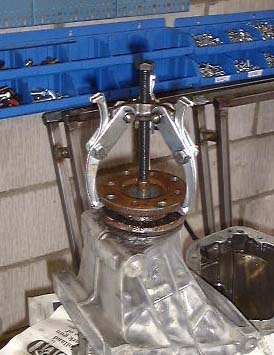 The pinion flange was then removed with the aid of a recently acquired puller
and it was a fairly easy job to lever out the old oil seal, with the aid of a large screwdriver and lot of swearing.
The new seal was pushed into place using a block of wood cut to the right size, and a big socket to hit it with.
The pinion flange was then removed with the aid of a recently acquired puller
and it was a fairly easy job to lever out the old oil seal, with the aid of a large screwdriver and lot of swearing.
The new seal was pushed into place using a block of wood cut to the right size, and a big socket to hit it with.
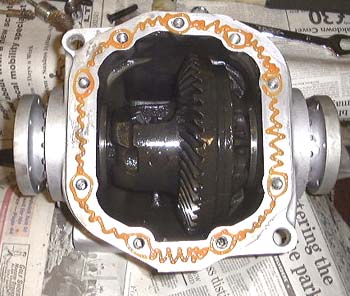
The next thing was to replace the driveshaft oil seals. First of all, the driveshaft stubs had to be removed from the diff. This was simply done by removing a circlip around the end of the shaft and sliding out the stub.
The seals on the driveshafts were a bit more recalcitrant, but succumbed to the use of the same puller seen here, although it had to be used in a rather novel manner. The new seals were then pressed into place with a large socket, again, and a hammer.
Replacing the drive shaft stubs was pretty easy, apart from the fact that the viscous mechanism inside the crownwheel had moved slightly while the stub was out, meaning it didn't just slide in. However, a bit of fiddling around had it in place.
 Apart from replacing the bolts on the inspection cover, that leaves the diff completely
done. I'll go and get the right sort of bolts on Monday, for now the cover is held on loosely by a couple of normal
hex bolts.
Apart from replacing the bolts on the inspection cover, that leaves the diff completely
done. I'll go and get the right sort of bolts on Monday, for now the cover is held on loosely by a couple of normal
hex bolts.
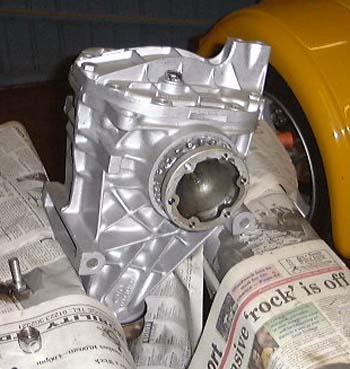
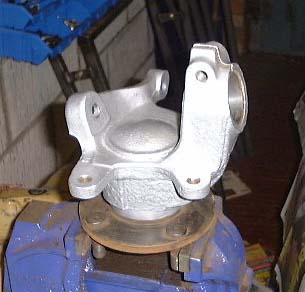
Finally, in order to make everything look nice, I gave the diff a coat of Hammerite smooth in silver, which means it now looks like this, apart from the fact that the real world is not usually blurred.
 I actually only finished painting the diff today, as I couldn't get at the back plate until
now. It now looks like this. I've remembered that the large mounting lug on the back will have to be ground down
before I've done, in order to miss the De Dion tube on the car's rear suspension.
I actually only finished painting the diff today, as I couldn't get at the back plate until
now. It now looks like this. I've remembered that the large mounting lug on the back will have to be ground down
before I've done, in order to miss the De Dion tube on the car's rear suspension.
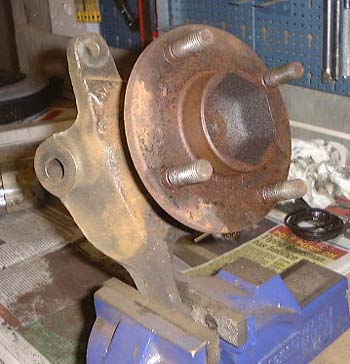
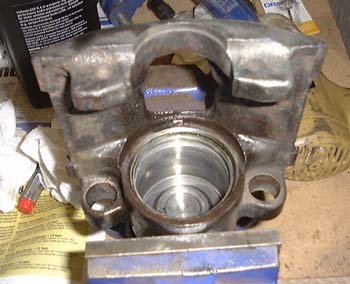
After that I moved onto the front uprights. These came apart fairly easily and look is pretty good condition. However, I think I will replace the seals in the brakes for good measure in any case. It's interesting how much bigger the pistons are in the front calipers than the rear ones.
 I spent a while cleaning up one of the front uprights with the usual wirebrushes.
(I'm actually wearing these things out...) This photo here is half way through the process.
I spent a while cleaning up one of the front uprights with the usual wirebrushes.
(I'm actually wearing these things out...) This photo here is half way through the process.
The bearings in this upright seem fine--there's no detectable play, so I don't think I'll replace them.
However, the rather drab colour and the grubby casting that is bound to start rusting again made me decide to paint these with Hammerite too. I wondered about what colour but decided I might as well stick to the theme and used silver. I did wonder if they would get too hot for Hammerite but decided that the diff itself would actually be hotter so I'll see how it goes. I suppose the right thing to do would be to have them powder coated, but that seems rather over the top.
 The upright (what Dax call a "knuckle") ended up looking like this.
At this rate I'll have to buy some more Hammerite.
The upright (what Dax call a "knuckle") ended up looking like this.
At this rate I'll have to buy some more Hammerite.
For those wondering, I still haven't decided what to do on the engine front. I came across a web site for Rimmer Brothers that has some amazingly cheap prices for v8 engines on it. So much so that they just have to be a misprint of some form. However, that's just more information which confuses me even more...
 I went to the local Ford dealers today and got some replacement seals for the
front calipers and some replacement boots for the CV joints on the driveshafts. I also ordered some new bolts for
the diff inspection cover.
I went to the local Ford dealers today and got some replacement seals for the
front calipers and some replacement boots for the CV joints on the driveshafts. I also ordered some new bolts for
the diff inspection cover.
Later on I replaced the seals in one of the calipers. To be honest it didn't need doing, but I would have nadgered the seals in the cleaning process in any case. The front calipers are child's play compared to the rear ones which have all the gubbins for the handbrake embedded in them.
After that I cleaned up the other front upright and painted it as well. At this rate I'll have a nice collection of shiny bits soon.
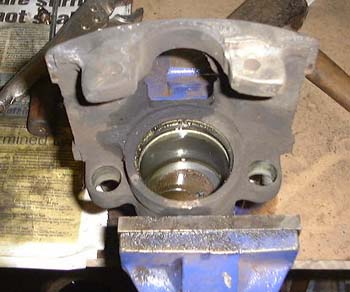 Today we cleaned up and fitted new seals in the other front caliper. Intriguingly,
this particular is a slightly different design from the other one, especially in terms of what it looks like inside
the cylinder.
Today we cleaned up and fitted new seals in the other front caliper. Intriguingly,
this particular is a slightly different design from the other one, especially in terms of what it looks like inside
the cylinder.
Just a short attack today. I spent a while cleaning up one of the rear hubs. Having decided that I would replace the bearings, I set about trying to get the oil seals out. I should know by now that this will never be a simple process...
I left it soaking in penetrating oil and retired hurt for the evening.
 I got some replacement bolts for the diff inspection cover, so I duly bolted
it down using some liquid sealant. (The Ford diff doesn't have a real gasket at all. With luck the thing will now
be oil tight but I can't see anyway of actually checking this. The diff in the Westfield leaks very slightly from
the rear cover.
I got some replacement bolts for the diff inspection cover, so I duly bolted
it down using some liquid sealant. (The Ford diff doesn't have a real gasket at all. With luck the thing will now
be oil tight but I can't see anyway of actually checking this. The diff in the Westfield leaks very slightly from
the rear cover.
I then managed to get the oil seals out of the rear hub, which means that the bearings themselves come out. Now I need to drive out the inner faces of the bearings which are behaving intransigently. You would have thought that they'd learn from the seals that I'm just going to get a bigger hammer tomorrow...
 I managed to get the rest of the hubs apart, with the aid of the bigger hammer
mentioned above. Which meant I was able to paint the hubs silver too. I think I'll leave putting the new bearings
in until I'm ready to put the hubs together again, as otherwise they'll have to sit around for ages with grot landing
inside the bearings and sticking to the grease there.
I managed to get the rest of the hubs apart, with the aid of the bigger hammer
mentioned above. Which meant I was able to paint the hubs silver too. I think I'll leave putting the new bearings
in until I'm ready to put the hubs together again, as otherwise they'll have to sit around for ages with grot landing
inside the bearings and sticking to the grease there.
The only concern with all this is that due to my stupidity I spent a while trying to bash out what I thought was a bearing but was really the flange that the bearing butts up against. I'll have to see how I feel about this, and I might well decide to get some other hubs. I might be able to get some ones that have better rear brake calipers that the ones I have too, which might actually save some money....
While cleaning the hubs up I noticed something that I'd noticed when I got the rear subframe, in that one of the wheel studs was bent. Luckily, as a result of messing about with the front wheels on the Westfield I have a collection of wheel studs and, having bashed out the old ones (I thought I might as well replace them all), I replaced them.
in case you've got to this frame directly and can't get out, go here.