 On account of the fact that I haven't
got much else to do, I have been spending a fair old time sorting out the wiring diagram for the new car. It isn't
finished yet but this diagram here is where I've got to. The idea has been to make it as small and simple as possible
(for example, without relays) but including the things I need for the race car like an FIA master switch. I was
help in thinking out the engine wiring by discovering a web site that included this document on the web that describes nice details about the 'blade wiring, in particular the mysterious
390 ohm resistor that's needed to defeat the hot-wire protection that's built into the CDI module. (That's an ECU
to you and me!)
On account of the fact that I haven't
got much else to do, I have been spending a fair old time sorting out the wiring diagram for the new car. It isn't
finished yet but this diagram here is where I've got to. The idea has been to make it as small and simple as possible
(for example, without relays) but including the things I need for the race car like an FIA master switch. I was
help in thinking out the engine wiring by discovering a web site that included this document on the web that describes nice details about the 'blade wiring, in particular the mysterious
390 ohm resistor that's needed to defeat the hot-wire protection that's built into the CDI module. (That's an ECU
to you and me!)
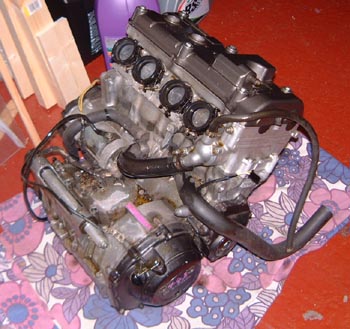 The best bit, though, is that today I got an engine. I have been keeping an eye out, although
so has Martin Bell, for one and one appeared on Ebay/the BEC list this week. I started an email chat with the chap
who was selling in and today we drove down to Guildford to pick it up. According to the chap I bought it off it
was originally in a Fireblade demonstrator and, for safety, it was restricted to about 33bhp by a restrictor plate
under the carbs. He said that the plate had a hole, "about the size of a baked bean" for each cylinder.
Supposedly, the engine has only done about 1000 miles.
The best bit, though, is that today I got an engine. I have been keeping an eye out, although
so has Martin Bell, for one and one appeared on Ebay/the BEC list this week. I started an email chat with the chap
who was selling in and today we drove down to Guildford to pick it up. According to the chap I bought it off it
was originally in a Fireblade demonstrator and, for safety, it was restricted to about 33bhp by a restrictor plate
under the carbs. He said that the plate had a hole, "about the size of a baked bean" for each cylinder.
Supposedly, the engine has only done about 1000 miles.
So, we piled it into the back of the family MPV and drove it home. It had supposedly been emptied of oil and it was clear, having opened the car, that it wasn't completely empty. In fact there was quite a lot of oil liberally soaking things, luckily just the collection of old blankets and curtains that I had wrapped it in. At least the oil was clean, backing up the claim of the seller that he had checked it ran a while ago.
 The engine is a 919cc CBR900RRX model (that is, number-plate X year: 1999).
This is pretty much ideal for the RGB series as it's the most recent version allowed for entry into class C.
The engine is a 919cc CBR900RRX model (that is, number-plate X year: 1999).
This is pretty much ideal for the RGB series as it's the most recent version allowed for entry into class C.
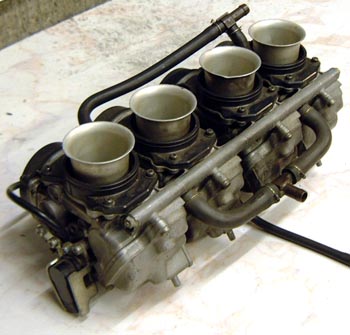
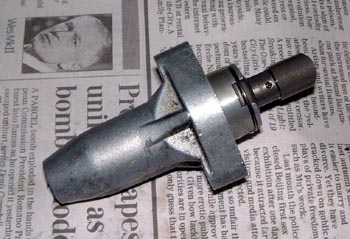
I also got the carbs, as shown here, for the engine. There are 4 38mm Keihin carbs, each of which seems pretty similar to an old SU carb, except that the venturi contrictor is not actually part of the mounting for the needle, but a plate in front of the needle. It all seems to move like an SU though. The thing sticking out to the right is the idle adjuster, if you're confused.
There was also the coils (it uses wasted spark ignition) and the complete wiring loom from the bike.
Having had a good look at it, the only things that I know are missing are the starter relay (but I already knew that) and the lever for the gearchange. I suspect I should easily be able to source those from somewhere else though.
Best of all, it's phenomenally light. The complete engine (about 140 bhp's worth) complete with built in 6-speed sequential gearbox can easily be lifted and carried about by two people, and pretty easily by one. No wonder bike-engined cars come out so light. I'm pretty sure that it's lighter than the gearbox for the V8 Dax Rush, let alone including the engine.
 I got back from a rather unsuccessful skiing holiday a few days ago. One thing that was
waiting for me was my registration for the RGB series. This showed that I had got my preferred racing number: 50,
which was chosen as a celebration of a certain event that takes place in a couple of days. God knows how I got
to be that old....
I got back from a rather unsuccessful skiing holiday a few days ago. One thing that was
waiting for me was my registration for the RGB series. This showed that I had got my preferred racing number: 50,
which was chosen as a celebration of a certain event that takes place in a couple of days. God knows how I got
to be that old....
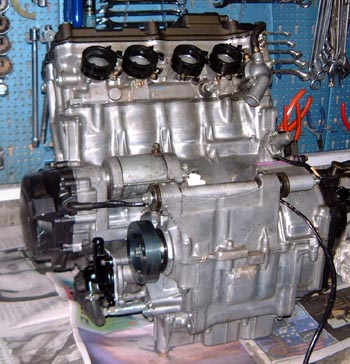
I started having a careful clean-up of the engine today. After the application of a certain amount of petrol and elbow grease it all looked a good deal cleaner. Some of the wiring was slightly damaged (the previous owner said that when he test ran the engine he ended up with a small petrol fire on top of the engine which burnt some of the outer insulation!) so I cleaned that all up and re-insulated things.
I took a few of the ancillaries off the engine, mostly things like coolant pipework. Although, having said that I can't be 100% certain about what they were so I'll have to find out.
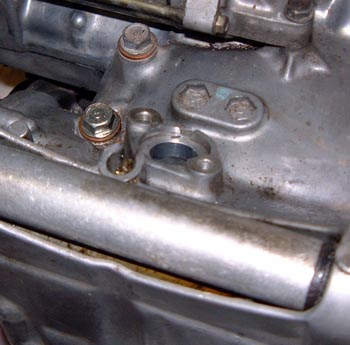
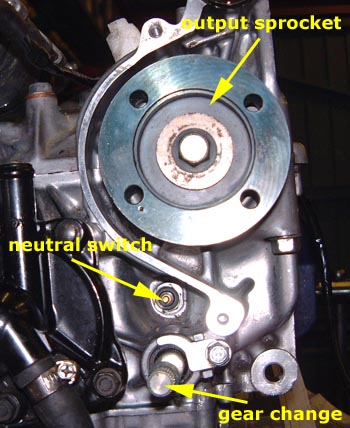 I had a chance to have a more careful look at a couple of things. One of these
is the neutral switch which I couldn't seem to make work when the engine was on the ground.
I had a chance to have a more careful look at a couple of things. One of these
is the neutral switch which I couldn't seem to make work when the engine was on the ground.
The switch is just between the output sprocket and the gear change rod, as seen on the diagram here. I took the switch out and prodded it around a bit and then put it back together. Now it seemed to work fine, which probably means it was just finger trouble on my part.
One problem with this switch, which I plan on using to drive a light on the dash so that I can tell when the engine is in neutral, is that I don't have the small wiring loom that connects to it. Hence I need to make some sort of connection.
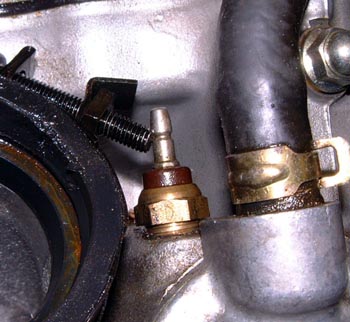 The sort of connection is that same as this one, which is for the temperature
sender. (At least, that's what I think it is!) With luck a normal female bullet connector will fit.
The sort of connection is that same as this one, which is for the temperature
sender. (At least, that's what I think it is!) With luck a normal female bullet connector will fit.
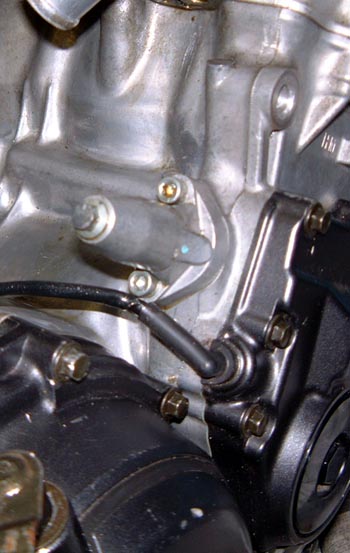
 Curiously, the sender is on top of a bit of casting that looks just like a thermostat
housing. What's more, from reading the Haynes manual, it was the thermostat housing on the older engines but the
thermostat is now in a separate housing mouted directly in the hoses.
Curiously, the sender is on top of a bit of casting that looks just like a thermostat
housing. What's more, from reading the Haynes manual, it was the thermostat housing on the older engines but the
thermostat is now in a separate housing mouted directly in the hoses.
 There's a hole in the top of the gearbox where the speed sensor should go. Unless
I try and use this then I need to bung it up somehow, in much the same way as I had to bung up the similar hole in the Dax gearbox!
There's a hole in the top of the gearbox where the speed sensor should go. Unless
I try and use this then I need to bung it up somehow, in much the same way as I had to bung up the similar hole in the Dax gearbox!
One thing I'm not sure about is whether I need a speedo. The regulations say that a car should be "MOT-able", which would surely need a speedo and odometer. However, I am definitely aware of cars that are racing without speedos. Perhaps the drivers just smile really nicely at the scrutineers?
 A further issue is this little gadget. This is the cam chain tensioner and the
chap I bought the engine off admitted to having taken this out and not set it back properly. So, I need to take
it out and adjust it properly. According to the Haynes manual it doesn't seem a big deal to do. There is a apparently
a special Honda tool, but you can just ignore it if you wish.
A further issue is this little gadget. This is the cam chain tensioner and the
chap I bought the engine off admitted to having taken this out and not set it back properly. So, I need to take
it out and adjust it properly. According to the Haynes manual it doesn't seem a big deal to do. There is a apparently
a special Honda tool, but you can just ignore it if you wish.
 I took the cam chain tensioner off this evening. At first it seemed odd in that
the nose of the tensioner, which presses on a device that actually presses on the chain, didn't pop out of the
end of the tensioner in the way it said it would in the manual. After some investigation what the seller had said
about the engine started to make more sense. It would appear that he took the tensioner apart, probably just to
see what was in there, and the spring lost its pre-load.
I took the cam chain tensioner off this evening. At first it seemed odd in that
the nose of the tensioner, which presses on a device that actually presses on the chain, didn't pop out of the
end of the tensioner in the way it said it would in the manual. After some investigation what the seller had said
about the engine started to make more sense. It would appear that he took the tensioner apart, probably just to
see what was in there, and the spring lost its pre-load.
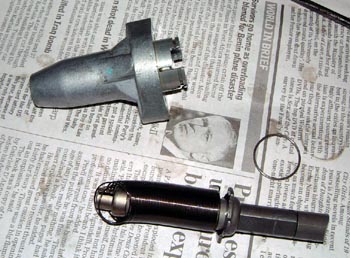 After a certain amount of muttering under my breath (the Haynes manual says
not to take the tensioner apart) it was obvious that I'd have to try and get some sort of preload into the spring
so I took off the circlip and took it to bits, as shown here. The spring in question is wrapped around the device
at the bottom.
After a certain amount of muttering under my breath (the Haynes manual says
not to take the tensioner apart) it was obvious that I'd have to try and get some sort of preload into the spring
so I took off the circlip and took it to bits, as shown here. The spring in question is wrapped around the device
at the bottom.
After a while spent faffing around I managed to work out how to get some tension into it and got it back together without it shooting off about the garage. The big problem is whether I've got the right amount of tension in it. To be honest, it might be sensible to get a new one, the thought of having the wrong tension in the camshaft drive chain, on an engine with rev limit of 11,000 rpm, is not too comfortable. If nothing else, I need to get a new gasket for it anyway, as the old one wasn't even present.
 In order to see if the valve train, in general, looked OK I took off the cam cover to have
a quick peek. It all seemed fine, although amazingly small and delicate. In fact, I've realised that I need to
buy a small torque wrench as the ones I've got are no use for doing anything up on this engine as they don't have
a low enough range.
In order to see if the valve train, in general, looked OK I took off the cam cover to have
a quick peek. It all seemed fine, although amazingly small and delicate. In fact, I've realised that I need to
buy a small torque wrench as the ones I've got are no use for doing anything up on this engine as they don't have
a low enough range.
 One other issue is the sprocket adapter. I've realised that with it bolted securely
onto the output shaft there's about 5mm of end float.
One other issue is the sprocket adapter. I've realised that with it bolted securely
onto the output shaft there's about 5mm of end float.
In fact, it looks as though it needs some sort of spacer as like this it looks almost lethal.