 It was time to do some of the real bodywork. The main Rush bodywork is in several main
pieces:
It was time to do some of the real bodywork. The main Rush bodywork is in several main
pieces:
- Rear tub
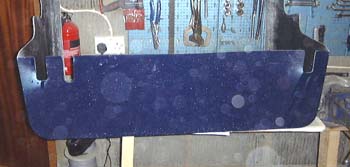
- Side panels
- Rear wings
All of these seem to be interdependent as to how they fit. The side panels, for example, have to be trimmed to length to fit against the rear tub. The rear wings are just attached through the tub onto the chassis underneath.
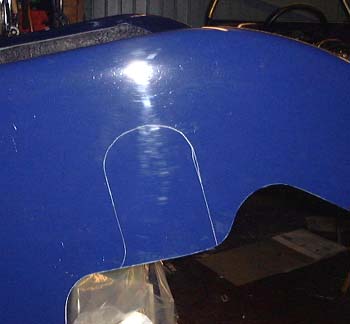
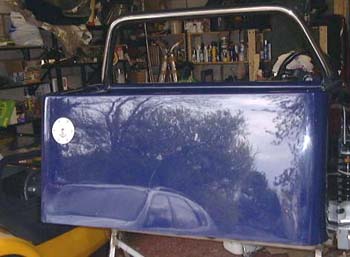
So, I decided to have a go at fitting the rear tub first, or at least to get it positioned and clamped in position until I found out I had to move it. The first thing I noted was that the sides of the moulding had a cut out marked, presumably to clear the rear spring/damper assembly.
I tried offering up the tub to the rear of the car to check that the cut outs were in the right position. It was very hard to tell, due to the confusion of non right angles, but it seemed about right. So, I proceeded to chop them out with the usual collection of GRP implements.
After that I got back into trying to fit the damned thing.
It was already getting to me, one reason being the rather poor quality of the moulding. I was amazed by the variation in thickness of the GRP. One of the pieces I took out of the spring cut outs, about 100mm across, varied in thickness between 8mm and 2mm. Furthermore, the lower right of the back of the tub has an area where it would seem the mould is not the correct shape, or there was some air under the gel coat. This is manifested by a strip about 10mm by 200mm which is depressed below where it should be. I don't think it will be too visible but I'll see it... This along with the poor quality of the chassis powder coating is rather depressing, especially compared to the exemplary condition of both of these things on the Westfield.
In the process of trying to fit the tub, it became apparent that the marked cutouts were only appropriate for the IRS Rush. Those for the de Dion are the lumps just in front of the IRS ones (to the right in the photo above. Oh well, it shouldn't matter as it's all inside in the wheelarch.
 However, one thing that did need cutting out was in order to make the "floor"
of the tub clear the chassis members just under the sides of the fuel tank. There was already a cut out for the
fuel exit pipe, but nothing for these rather obvious chassis members. Again, I suspect this is because this is
a new feature of the de Dion chassis. It's a pity they don't tell you this as we spent a while pushing and shoving
before it became obvious that this was the problem.
However, one thing that did need cutting out was in order to make the "floor"
of the tub clear the chassis members just under the sides of the fuel tank. There was already a cut out for the
fuel exit pipe, but nothing for these rather obvious chassis members. Again, I suspect this is because this is
a new feature of the de Dion chassis. It's a pity they don't tell you this as we spent a while pushing and shoving
before it became obvious that this was the problem.
All the same, this was easy to fix with the addition of two new cutouts in the tub floor, as seen in the photo here. (The camera lens appears to have acquired a lot of GRP dust here...)
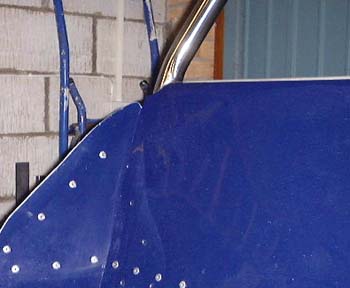
So, it was back to the pushing and shoving. The problem now was the rear shoulder panels. The "ears" on these panels are too large and had to be cut down somewhat, although working out by how much involved a lot of trial assemblies. Furthermore, after much more effort, it was clear that we were going to break something unless we eased the pressure on one side somehow. The problem was that on the passenger side of the car, the "ear" was positioned too close to the centre of the car. It would have been better to have positioned it better when I fitted it but I can't see that it would have been possible as the lower part of the panels is riveted firmly to the chassis. The only way of changing the position of the "ear" would have been to space the lower part of the panel outwards (to the inside of the car) slightly.
I solved this in the rather inelegant way of cutting a slot down the back of the ear, so that it could be bent towards the outside of the car and fit inside the forward legs of the tub. I will have to fill the resulting hole with some Würth. However, this time it could be fitted.
 The only problem remaining
was where to position the tub. The manual is, to say the least, confusing on this subject. There are at least 4
versions of the basic measurement and two diagrams that should the fitting:
The only problem remaining
was where to position the tub. The manual is, to say the least, confusing on this subject. There are at least 4
versions of the basic measurement and two diagrams that should the fitting:
- The main text says that the measurement from the inside of the rear boot box moulding to the front of the rear bulkhead should be 430mm.
- The errata that came with the manual says that that should read 410mm.
- One of the diagrams shows the measurement being 17". (Which is pretty close to 430mm.)
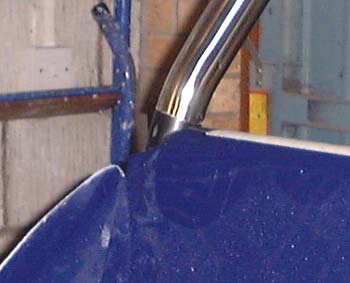
- Another diagram includes a cross-section, as shown in the right, which shows a measurement of 410 mm from the inside of the boot box flange to the centre of the roll above the bulkhead.
After much measuring, including of the boot box itself, I decided that the last measurement is the correct one. Confusingly this is in the bit of the manual that is concerned with the boot box and rear wing fitting, rather than the bit that addresses the rear tub itself.
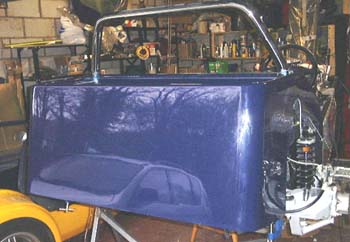 After all that we ended up with the tub in position, but only clamped there.
The manual says that you should just clamp it until the sides have been fitted. I'm not sure if I'll do this, as
I would rather it was fitted up firmly against the bottom of the chassis. It's hard to see what I would want to
do to change position now it's there. Perhaps I'll go and read the manual again...
After all that we ended up with the tub in position, but only clamped there.
The manual says that you should just clamp it until the sides have been fitted. I'm not sure if I'll do this, as
I would rather it was fitted up firmly against the bottom of the chassis. It's hard to see what I would want to
do to change position now it's there. Perhaps I'll go and read the manual again...
One slight concern is whether the lights I've got are going to fit without bashing into the fuel tank on the inside. I may have to space them out a bit.
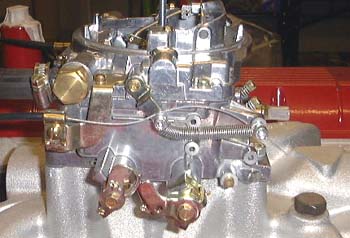 Finally, I bought a spring for the choke cable in MacKays earlier today. Now it's fitted
I've finished the carb connections!
Finally, I bought a spring for the choke cable in MacKays earlier today. Now it's fitted
I've finished the carb connections!
As I said a while ago, I had not managed to detect any resistance in the windings of the starter motor solenoid. So I took it into the merry chaps at Lucas and asked them to have a look at it. They confirmed that the solenoid was duff and said they could fix it all up for about £80. So we'll see what they manage later this week.
A while ago I ordered some stuff from Think Automotive. This included:
- An adapter to allow me to connect up the clutch hose I got from Rimmers.
- A bleed valve for the petrol pipe inlet to the tank.
- A blanking plug for a hole in the inlet manifold.
- An adapter to all me to connect the oil pressure sensor to the engine.
 Fitting the clutch hose was pretty simple, although I'll have to get a copper washer to
seal the adapter at the master cylinder end. If anyone wants to know, I got the replacement hose from Rimmers which
has an adapter on either end for the SD1. The slave cylinder end is fine but it needs a -3 JIC to -4 JIC adapter
at the master cylinder end.
Fitting the clutch hose was pretty simple, although I'll have to get a copper washer to
seal the adapter at the master cylinder end. If anyone wants to know, I got the replacement hose from Rimmers which
has an adapter on either end for the SD1. The slave cylinder end is fine but it needs a -3 JIC to -4 JIC adapter
at the master cylinder end.
The oil pressure gizmo is going to be a bit more difficult as the oil pump is rather close to the lower steering column. I might need some sort of angle adapter here....
I also phoned up the "British Motor Industry Heritage Trust" as I need to establish the age of the engine. I phoned up and spoke to someone in the "archive" department, to whom I then faxed off the engine details and credit card bumpf. We'll see what happens.
I phoned up Greengauges to try and get a better adapter for the oil pressure sensor. They're putting something in the post. (They're always very pleasant on the phone.)
At lunch time I took a trip down to Dax, intending to order an exhaust system. I've finally given in and decided to go the easy, but expensive, way. Rather shockingly, they had one in stock so I'm now the proud possesser of a very shiny exhaust system! I also bought a few odds and sods and took the chance to have a chat to Peter Walker about fitting the exhaust, as the LWB chassis doesn't have the same fitting as the normal one. Essentially, I just need a couple of large bits of steel clamped either side of tht GRP floor to take the weight of the exhaust. Interestingly, the Dax LWB demonstrator has a additional steel support that goes across under the seat, which was added for SVA. Peter says that these are being made available for all existing LWB chassis. He said to "nag them" for them in a while...
While I was at Dax I measured up a couple of their demonstrators, enough to know that my choice of rear tub measurement was about right.
 Rather amazingly there was a letter from Heritage this morning. Apparently my engine was
first manufacturerd in August 1978. That should entitle me to emit large quantities of smog...
Rather amazingly there was a letter from Heritage this morning. Apparently my engine was
first manufacturerd in August 1978. That should entitle me to emit large quantities of smog...
 I took some of the afternoon off today with the intention of trying to get a
bit further, I didn't get very far though. Having worked out that I could fit the rear tub now I took it off again.
The reason was that I wanted to sort out the powder coating on the roll bar. The roll bar had not been masked well
enough when the chassis was manufactured and some of the black coating needed to be removed before fitting the
rub as it will be impossible to get at once that has been done.
I took some of the afternoon off today with the intention of trying to get a
bit further, I didn't get very far though. Having worked out that I could fit the rear tub now I took it off again.
The reason was that I wanted to sort out the powder coating on the roll bar. The roll bar had not been masked well
enough when the chassis was manufactured and some of the black coating needed to be removed before fitting the
rub as it will be impossible to get at once that has been done.
So I removed the coating, with the aid of a wire brush which was the only thing that I could shift it with, although
now I wonder if I could have used some carb cleaner, and polished the bar back up again.
 While the car was like that, I took the opportunity to rivet the "ears" of the
shoulder panels to the chassis rail that's behind them. With luck that should make it easier to fit the tub in
position.
While the car was like that, I took the opportunity to rivet the "ears" of the
shoulder panels to the chassis rail that's behind them. With luck that should make it easier to fit the tub in
position.
After that it was pretty easy enough to get the tub back in position and mark it so that I could start fixing it in position. However, I had to go the pub with some other kit car builders and work came to a stop...
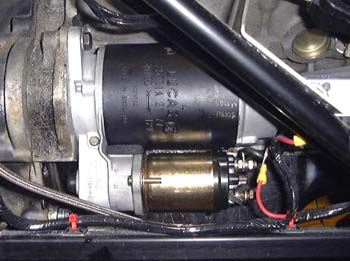 Yesterday, I got the starter motor back from Lucas. They've clearly replaced the solenoid
and tested (and guaranteed!) it all. It all looks pretty clean and I bolted it back in, narrowly missing the clutch hydraulic pipe.
Yesterday, I got the starter motor back from Lucas. They've clearly replaced the solenoid
and tested (and guaranteed!) it all. It all looks pretty clean and I bolted it back in, narrowly missing the clutch hydraulic pipe.
After that I could wire it up, meaning that I just have to connect the positive battery tail to the solenoid for all that bit of wiring to be done. I also wired in the temperature sensor, which is up near the alternator. I've been looking into the issues associated with the cooling pipework. At the moment it all looks a bit complicated!
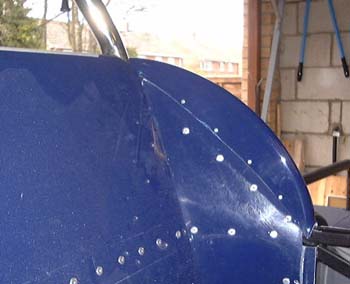 After that it was back to the rear tub. Having worked out where the tub had to go I took
it off again, so that I could put some gunk on all the connection places. Then I put it back in to position and
fixed it there, which involved a lot of grovelling under the car. (I really need to clean it up down there.) As
part of fixing it in place, I put some peel rivets into the ears of the shoulder panels to hold the bits of GRP
together.
After that it was back to the rear tub. Having worked out where the tub had to go I took
it off again, so that I could put some gunk on all the connection places. Then I put it back in to position and
fixed it there, which involved a lot of grovelling under the car. (I really need to clean it up down there.) As
part of fixing it in place, I put some peel rivets into the ears of the shoulder panels to hold the bits of GRP
together.
 Finally, for today, I installed the fuel filler into the rear panel, just to take some
of the "slabness" out of it. Oh yes, and I fitted the connector for the wiper motor, mainly because I'd
worked out what the pin-out was and thought I better do it before I worked it all out again. (Paranoia, you see...)
Finally, for today, I installed the fuel filler into the rear panel, just to take some
of the "slabness" out of it. Oh yes, and I fitted the connector for the wiper motor, mainly because I'd
worked out what the pin-out was and thought I better do it before I worked it all out again. (Paranoia, you see...)
I continued with the bodywork today, trying to fit the side panels. On the rush these have to be trimmed to fit, and for the LWB car are supplied way over length, by about 15cm. However, after carefully chipping away using a Dremel it became obvious that there is a problem, which was only manifested when the panel was nearly fitting. The problem is in the height of the panel, which must clip over the top and bottom of the chassis side. The problem seems to be caused by the GRP floor in that the maximum height that I measure the panel will fit over is about 310mm and the measured height of the side is 315 mm, some of which is due to the thickness of that floor. It is just about possible to bend the panel over the side but it looks very unattractive due to the poor fit.
I'll phone up Dax on Monday and see what they have to say. At the moment I'm rather unimpressed. It's become clear that by buying the LWB chassis I'm rather a guinea pig anyway. For example, the handbrake cables didn't fit and Dax now say that additional bracing is required under the seat.
in case you've got to this frame directly and can't get out, go here.