 OK, I’m back again after a couple of months seemingly covered in dust and generally making a quite spectacular mess. A word of thanks is due to my spectacularly wonderful wife for putting up with the mess. Mind you, whenever I talk about slowing down a bit Anthea’s the first to complain. So, it’s still grindstone time for me.
I mentioned last time that I was in the process of making some bodywork to my own design. This is, of course, the Royal “my” meaning something that Adrian, Tom and myself have talked about at great length. The process of bodywork construction, at least of this mostly traditional variety, is that you first make a positive—the buck or pattern—you then take moulds from that and then use those moulds to make the final bodywork. So, it’s a positive to negative to positive process.
In my case the buck is being made out of timber, MDF, polyurethane foam, prodigious quantities of hot glue, hundreds of screws, thousands of staples and brads, and lots and lots of filler. All of these materials generate their own sort of mess: sawdust, MDF dust, polyurethane dust and filler dust. What’s more, this is in increasing annoyance level. The last one is rather frustrating because the vast, vast, majority of the filler that goes onto the buck gets promptly sanded off again producing, in the process, a very fine powdered version which gets absolutely everywhere. The garage currently has a rather festive appearance until you realise that all that pretty white snow that’s sitting on everything isn’t going to melt any time soon.
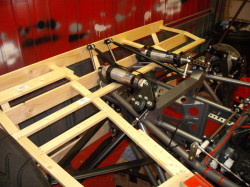
Still, enough of the complaining; after all, I didn’t have to do this… I thought it was about time to show you all some more details, so here we go. The photo at the top of the page shows part of the substructure of the buck. This is made of timber, machine inserted staples and brads and vast quantities of hot glue. The injuries caused by the last item have now almost subsided.
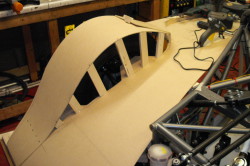
The next photo shows part of the MDF skin, in this case over the front right wheel. This is mostly MDF bent around to the shape desired with a lot more timber to provide the support. You can probably tell by looking at the photo that there are also a lot of screws. I counted them up the other day, there are about 600 or so of them in the buck someplace or other. Most of them have been inserted by hand as my electric drill come screwdriver had the countersinking bit in it most of the time.
This photo shows the collection of materials in the buck a bit better. Note that you can see the foam which comes in a collection of colours; odd that because all those bits were cut from the same foam block. Note that you can see a few more of that Olympian collection of screws in the timber around the wheelarch.
The rest of the buck’s underlying structure was completed in pretty much the same way. Obviously this isn’t suitable for the final mould manufacture though: if nothing else it’s got lots of holes in it and the mould material would fall through.
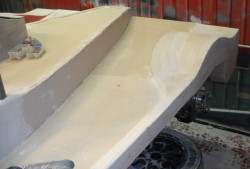 That was the point at which I broke out the filler and started the cycle of adding filler and the rubbing of it away again. I got better at doing this as I went and developed a bunch of rules including:
- Use the most aggressive abrasives you can get away with. There isn’t any point faffing about when you’re going to be back filling again in a few minutes. it doesn’t matter if you go too far: you can tell when the colour changes and you just stop and re-fill it.
- Rather than expending elbow grease you might as well use a machine sander such as an orbital sander or a multitool. I actually ended up using 40 grit paper for a while in an orbital sander which generated astonishing quantities of mess.
- Use a breathing mask.
- Use forming tools, such as the inimitable balls on a stick, to get the repeatable curves such as the fillets between two surfaces.
Note that in the photo I’ve taken this early in the process and the vertical surfaces are looking pretty shoddy as this after the first filler skin on the underlying MDF/timber/foam substrate.
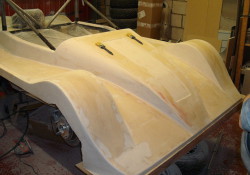 After a lot of that, in my case over several weeks, I got the buck to the state in this photo here. This is just before the next stage in the process which will be administered using those brushes that you can see sitting on the buck. There are two because Adrian was helping out here, you can just see his arm on the right hand side of the photo.
The next stage is to coat the buck with pattern coat. We’re using materials supplied by Easy Composites and there are two stages, each of them being an MEKP-catalysed gloop. The first is the primer which will be applied and rubbed down (there’s a surprise) in several coats. The optimistic* video on the Easy Composites web site just uses two coats but I’ve a suspicion that we’re going to need more to compensate for the non-ideal substructure. In particular the MDF goes a bit furry when rubbed down too aggressively.
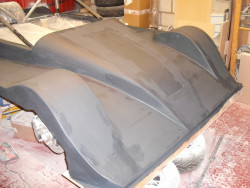 So, here’s the buck in its current state, melodiously revealing the reason for the title of this post. The reason for all those blobby bits is because of the variety of underlying materials. The shinier bits are where they underlying layer is exclusively filler, it’s a bit duller where it’s MDF presumably because the MDF absorbed the primer before it went off. Note that I’ve removed the ARB which was sticking up so as to make the substructure for the suspension access panel that will be in the middle of this part of the bodywork. Clearly what I need to do is re-engineer the suspension so as to keep the ARB inside the bodywork.
We’ve made some test pieces using this process and it’s pretty easy to rub down but, in the process, I’m sure it’s going to reveal a lot of underlying issues that will need small amounts of filler. In fact, the homogeneity of the surface as it is has already revealed a couple of places where some dozy pillock has neglected to properly fill a hole over a screw, for example.
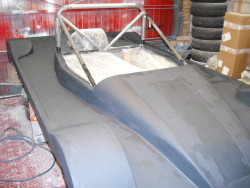 Best bit, though, is that it now looks much more like a car. What’s more, it oddly looks smaller; perhaps that’s a consequence of the colour.
*Watch it, he’s wearing a white tee shirt!

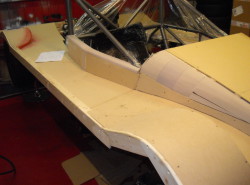
I like how my arm is covered in the ubiquitous white powder. We did have a dusty day doing the final rub down before the gloop:-) . And this mornings experiments with ” flatting the black” do us hope that the end may be nigh…. Or rather perhaps, the beginning of the end or indeed the end of the beginning. 🙂
It is very strangely both compulsive and therapeutic to get a flat finish on the black stuff.
I’ll post on the easy composites forum for you.
A
Tim
Have you left a draft on the engine bay area to ensure it comes out the mould??
And the sides of the side fences around wheelarches???
Austen,
There is in deed about a 7 degree angle on all the “vertical” surfaces. That’s taken a lot of filler to achieve! I’ve left the side pod section out as I think it’s better to fabricate later on.
Tim
Also it should allow us to try different sidepod profiles pretty easily.
Wait until all the neighbours go out. Open the garage door. Use a large garden vac on “blow” and starting at the back of the garage, walk forward waving it . . . the neighbours down the street will think your garage is on fire, and all the neighbours who were out won’t suspect a thing 😉
Bri