 Onwards and upwards. I tried to get stuck into the car again over the weekend, in particular I was aiming to get the ARBs finished off and all connected up.
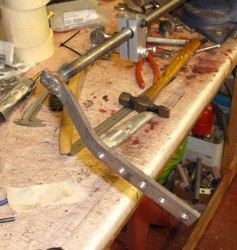
However, I seem to have spent an inordinate amount of time not achieving very much. I think the reason for this is that I’ve had to spent quite a lot of time fabricating things which always seems to take 100 times longer for real that it does in my head beforehand. In this photo is part of one of the mounts for the rear ARB.
I’ve decided to make two ARBs for each end of the car, with two different thicknesses of torsion bar. If I had the time I’d be spending some time engineering a blade-based ARB,  especially for the front where there’s an obvious way to mount one. However, for the moment I don’t have the time and I’m doing it in the simple way I’d always planned. The mount above is actually for the larger size of bar. Later on I might make some more mounts for the smaller size of bar or possibly some sleeves to make the smaller bar fit. The former would be better really as it would make swapping the bars over easier.
I decided a while ago to make the bar by welding levers on the end of the torsion bar, in the same manner as is done by the test bar for a Caterham that I bought ages ago. Here’s one end of the bar with the lever and one of the mounts also in shot.
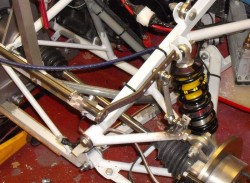
After making the mounts and the bar I then spent absolutely ages making sure that things articulated properly. To be honest I might actually move the ARB mountings a bit higher  as it’d make the articulation slightly better. However, it’s pretty good as it stands right now. The photo here shows one side with the bar connected to a tab welded onto the upper rear wishbone. In fact, you may notice that I’ve changed the position of the tab to improve articulation. I’m not really sure why it was on in completely the wrong place before, I must have had a rush of blood to the head.
You can probably see that the ARB is attached to the wishbone by a little turnbuckle that I made on the lathe. This means you can adjust the length of the drop-link very easily. There’s one huge advantage with the ARB being on top of the rear chassis like this, in that it will be dead easy to remove the ARB if I want to get the car in a position to run in the wet. I can do this with this arrangement by just removing one of the drop links. Admittedly the other side of the suspension would shove the torsion bar around but that shouldn’t be too big a deal.
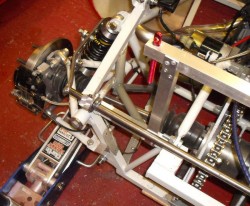
One issue I did notice is that with the suspension and transmission in this position then it’s only the bump stop in the suspension that stops the driveshaft banging into the chassis. At first I was worrying about this. However, I think it’s probably OK. Certainly any adjustment of the transmission at all, which will certainly be required as soon as I use the  car because the chain will stretch, will move the diff backwards slightly and improve the clearance around the driveshafts. However, I shall have to watch out for this…
I now have to clean up the ARB itself and stop it rusting. I was thinking that I’d get it powder coated but perhaps I can’t be bothered. I might just POR-15 it.
One minor issue, which you can see in the last photo, is that the gearchange cable is currently resting on the ARB. I shall think of some way of supporting that so that it doesn’t happen, perhaps pressing the rear bodywork support, which you can see sticking up in the photo, into a second use.
I do keep thinking that now the suspension units are fitted the car should be driveable. At some point in the near future I shall experiment with just driving it in and out of the garage. You never know, I might try and capture the momentousness of it all on video. Watch this space… 🙂
