So, with it now green and all nice and smooth as a baby’s bum, we decided that it was about time to add the gloss coat. This is the Easy Composites substitute for the more traditional painting of the buck. In any case, the best paint to use is 2-pack and neither Adrian nor I fancied the health risks that that brought with is, or the necessity of breathing air supplied by another compressor. (Breathing in dust is bad enough but breathing in what amounts to fine glue is altogether a different issue.)
The gloss coat is just another MEKP-catalysed 2-part gloop. This time it’s transparent and is, supposedly, thixotropic so that it doesn’t flow downhill with too much alacrity and self-levelling so you retain the nice finish on the buck.
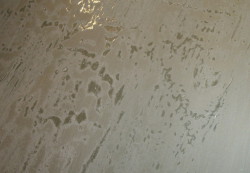
 However, in our case, it did neither of these good things. We don’t really know why and we’ve spent a good time talking to the nice people at Easy Composites about it. However, we were left with a buck that had horrible runs down any non-horizontal surface and deep holes as a consequence of brush strokes and bubbles appearing in the gloss. The photo here is a close-up of some of the problems, after the gloss had been rubbed down to some extent.
It may be that we just did it wrong, but as Adrian and I each did a separate side of the car, and we used rather different techniques but with the same end result, I’m just not sure. We don’t think it was too cold, as the garage is quite well heated. All the same, we were left with our lovely buck having a horrible gravelly finish. The only solution that we could come us with was to attack the whole thing with ruthless abandon to try and rub out the worst of the problems. The one bright side is that all of the problems are holes in the finish which will translate to bumps in the moulds which should therefore be easy to polish out of the mould. At least with the application of yet more elbow grease.
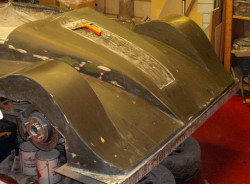
 So that’s what we did, with the end result shown here. The inevitable has happened, though, in that the amount of effort we’ve had to put into this has meant that we’ve broken through the primer in a couple of places to expose the underlying structure. I’m going to have to grind these out a bit and build up a primer/gloss layer on top of them. after that hard work, done with 180 grit paper, we worked our way up through 320, 600, 1200 and 1500 grit papers. We’ll now compound the surface. However, experimenting shows that we really need to use a machine to do this in order to save our aching arms…
We are now very close to starting to make the moulds. To do that we’ve ordered a quite prodigious quantity of resin, about 100kg of it. However, I should be at the end of the worst of the dust making and that previous photo is taken after I mopped (with water and detergent, natch) the floor to expose the red PVC tiles for about the first time in a while.
