 I’ve been slowly pressing on with the electrics. In particular, I’ve finished doing the engine loom, easily the most complicated bit, which is shown here languishing in the kitchen. This now fits the car and, as you can see, I’ve taped it all up so it shouldn’t be vibrating to bits at the first sight of a working car.
Tag: bodywork
Fluids
 I’m not sure if it’s really true, but I feel as if I’m getting into the endgame of this build. I think that means that there’s loads of bits and pieces to do, although there’s a couple of large things that I don’t know how to do yet, notably the gearchange and the exhaust.
Here’s a small bit of progress in that I’ve got the new fuel tank. As usual, I drew it out and ordered it from Bryn Jones at Allyfab who did his usual superb job. At the top is the tank sitting in the chassis. That was a bit of a relief as I’d tried to get the tank as big as I could, but was worried that it’d come out just a little bit too big.
White stripes
 Some progress again at the weekend, although whether this is enough is anyone’s guess.
First up, as I promised, are some turnbuckles to adjust the tension in the chain. Here’s one of them, although admittedly it’s hiding behind a bit of chassis. Essentially it’s a right hand threaded rod end, a left hand one, and a length of hex bar with a right hand threaded hole in one end and a left hand threaded hole in the other. You can just twiddle this around to change the distance between the two rod ends, thereby moving the diff carrier and tensioning the chain. There’s another one of these, exactly like this, on the other side of the diff. Continue reading “White stripes”
All gone!
 I thought I might as well try the rear bodywork on as well, so I persuaded Anthea to give me a hand to manoeuvre it into position and here it is. It was sort of interesting to see the car like this, if only to convince myself that I was making some progress, even if I was going to take everything to bits again.
Well, that’s annoying…
 I ordered a set of taps from RDG Tools and tapped one of the brake mounting blocks to M10x1.5 for the mounting bolts through the calipers. The end result is shown in the photo here. I’ll make some spacers of the proper size, and get the correct length bolts, rather than using stacks of washers. However, it seems to fit fine which is good.
And stitching her back together again…
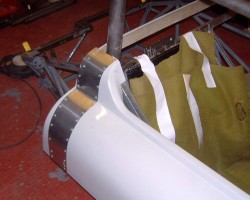
 As good as my word, I fixed the central tub back together again. The photo here is of one side of the re-attached bodywork. Anthea commented that it actually looks quite good, and it could even be left like this. I don’t actually think that’s the case as when I paint the rest of the bodywork it’s bound to degrade.
And for my next trick…
 … I will saw this attractive young woman in half. Well, I will in a minute but I need to explain why first.
The thing is, I wanted to check the steering rather more carefully, and perhaps change the routing of the column a soupçon. In order to do that, I needed to check how it fitted under the bodywork. The problem is, I had to do lots of faffing around to get the central portion to fit over the cage; for example to allow the front hoops of the cage to stick through the bodywork, and also to allow the steering column to poke through the front of the central bodywork section. You can see both of these in the photo on the right.
